CHAPTER 9
HOW TO CREATE A WINDOWS PROGRAM.
OVERVIEW:
We are now in a position to describe the basic structure of a program written to work in the Windows operating system.
We already know that Windows doesn't send a message to an application as something to be operated on immediately, and can assign a message to a program without immediately activating the program to receive the message. For this reason, each program is assigned a message queue, which can store a whole series of messages.
To link itself with its message queue, which is within the operating system, a program calls an API function, GetMessage, which monitors the queue so as to be able to pick up messages whenever the system assigns it its access to the CPU.
However, even when a program does receive a message from its queue, it doesn't operate on the message immediately, but must send it back to Windows to notify Windows as to which message has been picked up and is to be assigned for immediate action.
Windows then returns the message to the main program code directly, to the program's second entry point, and not via the message queue code entry point.
This hands over the operating system to the main body of the program code so that it can communicate with the CPU and peripheral hardware, like the keyboard, video screen, etc.
Every Windows program code is thus divided into two parts, representing the two different entry points, or points of contact with the operating system. The first part deals with monitoring messages from the queue, and the other contains the main body of the program's code. This is illustrated in the following diagram.
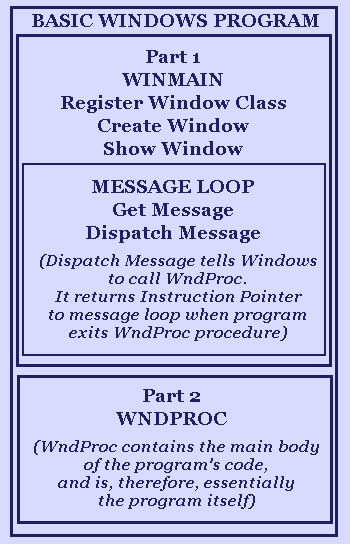
As can be seen in the diagram, parts 1 and 2 consist of two procedures: WinMain and WndProc respectively. The message loop is part of the WinMain procedure, but is shown in a box because the program enters WinMain only once, at the start, but exits and returns to the message loop in response to every message received, and thus essentially remains in the message loop part of WinMain as long as the program is running (except, of course, during the times when the program is operating via part 2).
It thus starts by calling the API function GetMessage, then calls TranslateMessage, than DispatchMessage, and then transfers to part 2, then returns from part 2, via a return from the DispatchMessage call, to the message loop, loops back to GetMessage again, and so on.
Just as a program can call Windows API functions, or procedures, that exist within the Windows operating system, the Windows operating system can also call a function, or procedure, within the program itself, if the program gives it a procedure name, or address, to call. This is how Windows activates the WinMain procedure code at the beginning, and also how it activates WndProc in order to return a message to the main body of the program's code. From a technical viewpoint, of course, these calls mean the transfer of the instruction pointer to the entry point of either WinMain or WndProc.
Thus, the two separate parts of a Windows program code are set up as two procedures that can be called by Windows. Windows first calls WinMain at the start of the program and, when required, calls the program procedure WndProc.
The first part of the program code, before the message loop, initially sets up the program's screen window, and then tells Windows to display the window on the desktop. The code then enters the message loop.
The operating system itself contains the code that actually draws the basic window on the screen, but the programmer has a number of choices about what features it should have (it might be desirable, for example, that the window should not be variable in size, but have a fixed size on the screen, as is the case with a calculator window). Such choices are set up by the program code before the window is drawn on the screen.
After setting up the window, the program code then enters the message loop part of WinMain, and connects itself to its message queue. The task of WinMain is to constantly monitor the message queue via this API function. The instruction pointer stays within the GetMessage code, within the operating system, until it detects a message in the message queue, at which point it returns the message, together with the instruction pointer (i.e., via a 'ret' instruction within the GetMessage code), to the program code. If the system has handed the instruction pointer to another program, it is, of course, no longer within the GetMessage code. But Windows returns it to the GetMessage code when it assigns a share of CPU time to the program.
The program code then responds to the message by means of the two API functions TranslateMessage and DispatchMessage. TranslateMessage tests to see whether or not the message is a WM_KEYDOWN message from the keyboard. If it is, the function tests to see if this refers to a printable text character, or some other keyboard key. If it refers to a text character, TranslateMessage puts a WM_CHAR message in the message queue, and otherwise returns without doing anything.
Once a message has been picked up from the queue, the program sends it back to the Windows system, via the DispatchMessage API function. The operating system then sends the message directly to WndProc, which contains the main body of the program's code, for immediate action.
WndProc is referred to as the program 'Callback Function'. The Callback Function thus reads the message and then selects the segment of the main body of the program code that responds to that particular type of message.
The name Callback Function, or Callback Procedure, is merely a description of the fact that, after it has been sent a message taken off the queue, to notify it as due for immediate action, Windows 'calls back' to the program again, in order to give the message to the main body of the program's code.
All this complexity is simply to enable the operating system to have sufficient flexibility to be able to manage the assignment of CPU time to separate, independent programs that may be open on the desktop at the same time. Also, if a program has more than one window at the same time, with more than one callback function, Windows can dispatch each window's messages to its proper callback function
PARAMETERS PASSED FROM WINDOWS TO PROGRAM PROCEDURES:
A few additional considerations, as outlined here, are necessary in order to bring us to the point of being able to actually write the code for a basic working program.
Firstly, there is some additional complexity to be understood in respect of the use of the memory referred to as the stack. In addition to pushing values onto the stack, on top of one another, and popping them off again, using only the 'push' and 'pop' instructions, provision has been made for also gaining access to stored values below the top of the stack.
We have seen that there are two special registers by means of which the computer processor connects to memory addresses on the stack, and controls the operation of the stack, and these are called the 'base pointer', ebp, and the 'stack pointer', esp.
The stack is simply a section of contiguous memory locations, and the push and pop instructions simply tell the CPU to move a value into or out of the top of the stack and then move the stack pointer to the next stack address, thus either increasing or decreasing the number of 'stacked' values. The stack pointer therefore always points to, and hence identifies, the top of the stack at all times. If you move the stack pointer directly, not via a push or pop instruction, you automatically redefine the top of the stack.
The base pointer also points to the stack, but it is independent, and does not have to point to the top of the stack, and is unaffected by the push and pop instructions. It points to some internal address underneath the top of the stack, and can be moved independently of the stack pointer.
The base pointer can be used as a 'base' from which to access addresses underneath the stack pointer, as offsets from it, such as [ebp], [ebp+4], [ebp+8], etc. which access stored values at addresses ebp, ebp+4, ebp+8, etc. These additional features of the stack need to be understood here, as they are used in setting up the code for creating a Windows program.
Windows API functions don't pass values back to the program, as results, in the same way that the program passes parameters to them, i.e., they don't pass them as parameters on the stack. Instead, register eax is always used for one of the return values of an API function and, if there are more return values, the API function asks for memory addresses from the program's memory to be passed as some of its original parameters, so that it can put the return values into these memory addresses.
When, however, Windows calls a function belonging to the program itself, rather than returning values to the program from an API function call, it also passes parameters to the program procedure by pushing them onto the stack, in the same way that the program passes parameters to a Windows function.
That is, just as a program pushes API function parameters onto the top of the stack, when calling it, the operating system also pushes program function parameters onto the top of the stack when calling a program function like WinMain and WndProc. When the parameters have been pushed onto the stack, the call instruction then pushes the return address from the call on top of them.
This is not all, however, because Windows requires a called procedure to also save several specific register values (in registers ebx, esi, and edi) by pushing them on the stack on entry and popping them off again when exiting. This suggests that Windows, in fact, also passes additional parameters to a program procedure via these particular registers, or their saved values on the stack. Such parameters, however, are not for the use of the program code,
and are irrelevant to it. They are merely values created by Windows, to be used by Windows in a way that is not clear, and are therefore merely to be saved on the stack for this purpose, rather than being actually used by the program code.
These register values are not pushed onto the stack by Winows, and must therefore be pushed onto the stack by the program code, on top of the parameters, and procedure call address, already put there by Windows. The reverse of this must be carried out on exiting the program procedure, back to Windows, and these code sequences are often referred to as prologue and epilogue codes.
All this pushing of values creates a problem for the program code, in that the parameters it may want to use have been pushed first, and are underneath the call return address, and the saved register values. This is where the base pointer can be used to solve problems of this kind
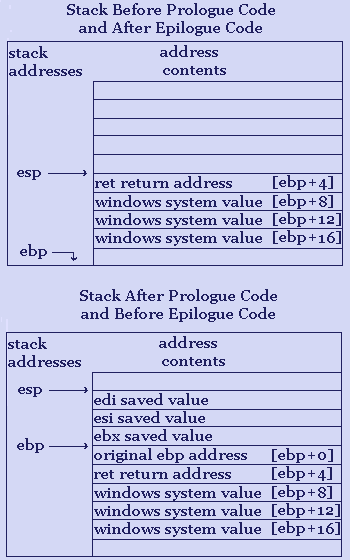
That is, the base pointer address is first pushed onto the top of the stack, by the program code, on top of the parameters pushed by Windows, to save the base pointer value for future restoration, and then the base pointer is moved to the top of the stack; which is the current address of the stack pointer, by the instruction mov ebp,esp.
Then the saved register values, mentioned above, are pushed on top of the base pointer position. The parameters pushed onto the stack by Windows, being thus underneath all these pushed values, are accessed by means of the base pointer as [ebp+8], [ebp+12] and so on ([ebp] contains the saved address of ebp before it was moved, and [ebp+4] contains the return address, within the operating system, to which the Instruction Pointer will return on exit from the procedure. [ebp+8] thus contains the first actual program parameter.
The following illustrates the condition of the stack before and after the prologue code.
The same technique is used with regard to the parameters passed to both the WinMain and Callback Functions, and we will see this method in more detail in the next section.
BASIC WINDOWS PROGRAM CODE DESIGN.
PART 1; WINMAIN:
As we have seen, WinMain is the first part of the two-part Windows program code, and contains the window creation code, and the message loop. The system doesn't really care what the name of the procedure is as long as it can determine what its address is, and this also applies to the name WndProc, given to part II of the code.
What follows here is the description of the code for the WinMain procedure of a working program. The code in the next section contains the complete WinMain code necessary to put a basic 500 x 500 pixels window on the screen.
Firstly I must explain that the code is in the High Level Assembly (HLA) code I use, which has been demonstrated in a previous chapter, and which is shorter and more convenient than the full Assembly Language version.
The HLA macros used in the code are, in order of their appearance: push.d, api, eq, err, and pop.d. I briefly explain these as follows: push.d and pop.d macros successively push or pop the parameters written on the same line after them. The api macro is used for calling Windows API functions. It pushes the parameters, written after the API function name, onto the stack, avoiding the necessity to write each as a separate push instruction down the page. The eq macro is merely a more elaborate mov instruction (eq [WNDCLASSEX.cbSize], '=', 48 is the same as mov dword [WNDCLASSEX.cbSize], 48) And, finally, the err macro puts a message box on the screen containing the error message text written after it.
WinMain initial code:
We can now examine the WinMain procedure code in more detail.
First, [section .text] defines what follows, for the assembler, as belonging to the section containing code, rather than to one of the data sections of the program. Then we have the 'globalisation' instruction GLOBAL _WinMain@10h, which exports, or 'globalises' the procedure name WinMain. This makes the address of the line of code called 'WinMain' available from outside the program code, so that Windows can transfer the instruction pointer to this address. If the name were not thus 'globalised', Windows could not call it.
Once globalised, the name is written as the start, or entry point, of the program code. The underscore and @10h are not strictly necessary, but comply with the convention used in globalising Windows API function names. The 10h (decimal 16) refers to the fact that Windows pushes 4 dword parameters (a total of 16 bytes) onto the stack when calling WinMain.
WinMain Parameters and Prologue Code:
The code immediately after _WinMain@10h pushes the stack base pointer ebp, to save its current address onto the top of the stack, above the parameters pushed by Windows, and then moves the base pointer to this position.
The three registers ebx, esi, and edi, are then pushed onto the stack, above the parameters and the saved ebp address, to save their values to be returned to Windows on exiting the program. There is no particular explanation for this, other than that it is an internal requirement of the Windows system. This is often referred to as the WinMain 'Prologue' code.
As explained previously, the four dword parameters pushed by Windows onto the stack are underneath
all these other pushed values, but can be accessed, if required, relative to the base pointer address as: [ebp+8], [ebp+12], [ebp+16], and [ebp+20]. In particular, the program instance handle, at [ebp+8], will be required for creating a window
Registering a Window Class:
The next section of code obtains and sets up the parameter values needed to register a 'window class' with the operating system.
The instance handle, [hInstance], is a handle of the current instance of the program and, as mentioned above, is one of the parameters, at [ebp+8], that was pushed onto the stack by Windows.
Next, we obtain a program icon handle, and a mouse cursor handle. IDI_APPLICATION is an equate name used to specify the default system *.exe file icon, and IDC_ARROW likewise specifies the default mouse arrow cursor. You can insert your own program icon, but I will leave a description of that until later, as I am attempting to keep this introductory code as uncomplicated as possible.
The handles of these two objects are saved as [ICON.Handle] and [CURSOR.Handle], and will be used as parameters in registering the window class, which will associate them with any window created in that class.
We then have the initialisation of the WNDCLASSEX data structure which the subsequent RegisterClassEx API function uses to register a window class. All the handles obtained above are inserted into the WNDCLASSEX data structure in the positions shown. Other parameters are _WndProc, COLOR_BACKGROUND, and WINDOW.ClassName.
_WndProc is the name, and hence also the address, of the callback function in part 2 of the program code, which is the second of the two program entry points that can be called by Windows. Windows needs this address so that it can call this procedure and must also associate this procedure with the class so as to associate it with all windows belonging to the class. You may note that _WndProc is not 'globalised' in the same way as WinMain, even though it, too, is called by Windows, and this is because its address has been directly passed to Windows instead. The address of WinMain could not be passed to Windows in the same way.
COLOR_BACKGROUND is an equate value that specifies that the windows of this class are to have the default system-wide window background colour. WINDOW.ClassName is the memory address of a class name string, which you can type into your program data section. The name can be anything: �myclass�, or �ClassA�, or whatever. The string must terminate in a zero, as is the usual requirement with Windows, and can thus be declared in the data section as follows:
WINDOW.ClassName db 'ClassA',0
The code now calls the RegisterClassEx API function and, if this succeeds, proceeds to create a window. If the RegisterClassEx call succeeds, RegisterClassEx returns the value 1 in register eax, and 0 if it fails. If eax is 0, the instruction pointer jumps to the address WinMain.Failed and the error message 'Failed to register window class!' is printed in a message box onto the screen. When the user closes the message box, the program terminates in the manner described further on, and thus fails to create a window.
A STANDARD WINMAIN CODE EXAMPLE:
[section .text]
GLOBAL _WinMain@10h
_WinMain@10h:
push ebp
mov ebp,esp
push.d ebx,esi,edi
eq [hInstance], '=', [ebp+8]
api LoadIcon, NULL, IDI_APPLICATION
mov [ICON.Handle],eax
api LoadCursor, NULL, IDC_ARROW
mov [CURSOR.Handle],eax
;
eq [WNDCLASSEX.cbSize], '=', 48
eq [WNDCLASSEX.style], '=', 0
eq [WNDCLASSEX.lpfnWndProc], '=', _WndProc
eq [WNDCLASSEX.cbClsExtra], '=', 0
eq [WNDCLASSEX.cbWndExtra], '=', 0
eq [WNDCLASSEX.hInstance], '=', [hInstance]
eq [WNDCLASSEX.hIcon], '=', [ICON.Handle]
eq [WNDCLASSEX.hCursor], '=', [CURSOR.Handle]
eq [WNDCLASSEX.hbrBackground], '=', COLOR_BACKGROUND
eq [WNDCLASSEX.lpszMenuName], '=', 0
eq [WNDCLASSEX.lpszClassName], '=', W.ClassName
eq [WNDCLASSEX.hIconSm], '=', 0
;
api RegisterClassEx,WNDCLASSEX
cmp eax, 0
je near WinMain.Failed
eq [W.X], '=', 300 ; W.X = window x, or horizontal, position on screen
eq [W.Y], '=', 300 ; W.Y = window y, or vertical, position on screen
eq [W.Width], '=', 500 ; window width
eq [W.Height], '=', 500 ; window height
mov ecx,WS_OVERLAPPEDWINDOW
api CreateWindowEx,0,W.ClassName,W.Title,ecx,[W.X],[W.Y],[W.Width],[W.Height],0,0,[hInstance],0
mov [WINDOW.Handle], eax
api ShowWindow, [WINDOW.Handle], SW_SHOWNORMAL
;
WinMain.MessageLoop:
api GetMessage, MSG,0,0,0
cmp eax, Yes
jne near WinMain.Exit
api TranslateMessage, MSG
api DispatchMessage, MSG
jmp WinMain.MessageLoop
WinMain.Failed:
err 'Failed to register window class!',0
WinMain.Exit:
pop edi
pop esi
pop ebx
mov eax,[MSG+8]
api ExitProcess,eax
mov esp, ebp
pop ebp
ret
Creating a Window:
If RegisterClassEx succeeds, the API function CreateWindowEx is called to create a window, and this function has a series of parameters that define further characteristics of the window beyond those of the window class. The parameters include the window class name address, and the window title address, which contains a string that appears as the name of the window in the window title bar. Next is the flag name WS_OVERLAPPEDWINDOW, which is one of the equate names that can specify features of the type of window that will be displayed. WS_OVERLAPPEDWINDOW specifies that the window will have a resizable border, a title bar, a title, and the three boxes in the top right corner of the title bar: a minimise box, a maximise box and a close box. The next four values specify the X and Y, or horizontal and vertical positions of the top left corner of the window when it appears on the screen, and the width and height the window is to have. In the above code, the window is set to be placed on the screen at x,y coordinates 300,300, and to have a width and height both of 500 (measurements are in pixels, of course). The window is then displayed on the screen by calling the ShowWindow API function. The window does not have to be shown immediately, but normally will be shown unless there is a reason not to do so. In this basic code there is no menu, so the window will not have a menu bar.
The WinMain Message Loop:
The next part of the code is the WinMain message loop, starting at 'WinMain.MessageLoop', which names the code address of the start of the message loop. This code calls the API function GetMessage, and hands over the instruction pointer to the GetMessage code, within the operating system, and waits for the API function to return with a message.
When the system returns 1, or 'Yes', in eax, handing back the instruction pointer to the program, and also putting the message in the MSG data structure provided by the program, the program code retrieves the message, calls the system to translate it, if it is a text character message, using the TranslateMessage API function, or ignore it if it is not, and then hands the message back to windows via the DispatchMessage API function. Windows then calls the program _WndProc procedure, and thus hands the instruction pointer to part 2 of the program code, which will be described further on.
When part 2 of the program code completes its processing the message, it exits part 2 of the code, back to Windows, and Windows returns the instruction pointer to the jmp WinMain.MessageLoop
instruction in the WinMain code, via an internal ret instruction within the DispatchMessage API function, and the code then jumps back to the 'WinMain.MessageLoop' address, and again calls GetMessage to wait once more for the next message to be passed to its message queue by Windows, unless there is already another message in the queue which it can pick up immediately.
GetMessage may not always return another message, as Windows could have handed the operating system to another window open on the desktop, in which case the program remains dormant in the background, while the instruction pointer is operating in some other program's code.
Exiting WinMain and Terminating the Program:
The final exiting from a program, when the user closes it, is carried out from within WinMain. If the user clicks the window 'close' box in the top right corner of the window, a WM_QUIT message will be returned from GetMessage, with eax returning 0, thus causing the code to jump to the address 'WinMain.Exit'. This will enter what is often called the WinMain 'Epilogue' code, which is the reverse of the so-called Prologue code.
This pops the saved values of the registers esi, edi, and ebx, back into those registers, and then calls the ExitProcess API function to tell Windows to terminate the program.
[MSG+8] contains the exit code provided to the MSG structure by the WM_QUIT message. When Windows returns the instruction pointer from the ExitProcess call, the code then moves the stack pointer to ebp, where it was on entry to WinMain, and then pops the base pointer from here back to where it was before Windows pushed the WinMain parameters. The stack pointer will now be pointing to what was ebp+4, which contains the operating system return address from its call to WinMain. Thus, the code now permanently returns the instruction pointer to Windows, to that address, via the final ret instruction. To understand this description, refer to the stack illustrations in a previous section of this chapter.
Although this is a complete description of the WinMain procedure, there are numerous variations and options relating to the creation of window classes and windows that could be discussed, but the above is sufficient to show the structure and working of WinMain, and also how to put a window on the screen.
PART 2; WNDPROC:
Part 2 of the program code is the Callback function, which contains the main body of the program code, and is the second of the two entry points provided for the operating system to call. The WndProc code requires its own so-called prologue and epilogue codes, which are identical in form to those used by WinMain.
The complete WndProc code for a simple, basic window is shown on the following page.
Again, the following code is in the HLA language I use. The HLA macros used here are, in order of appearance: push.d, set.d '==&', ii.., the start.if, if.d, then.call, then.jmp, end.if sequence, api, and pop.d. We have already encountered push.d and pop.d and api in the context of WinMain, and they need not be explained here.
set.d '==&', A,B, C,D� etc.
is a macro which means 'set all the pairs' (signified by
'==&') of values equal to one another, i.e., A = B, and C = D, and so on. set.d means 'set as dword values' as distinct from set.b (set as byte values), or set.w (set as word values)
The ii.. macro allows more than one Assembly Language instruction to be written on the same line across the page.
The start.if to end.if sequence tests the value of [MESSAGE] and compares it successively with each of the parameters to the right. if.d '=', [MESSAGE]... means 'if the value of [MESSAGE] is equal to any one of the following message values'� Again, if.d specifies dword values as distinct from if.b, For byte values, or if.w, for word values. If [MESSAGE] is, in fact, equal to any one of the messages on the right, the then.call macro calls the corresponding procedure shown immediately below it. A corresponding meaning applies to then.jmp and else.jmp.
A STANDARD WNDPROC CODE EXAMPLE:
_WndProc:
push ebp
mov ebp,esp
push.d ebx,esi,edi
;
eq [WINDOW.Handle], '=', [ebp+8]
set.d '==&', [MESSAGE],[ebp+0Ch], [WPARAM],[ebp+10h], [LPARAM],[ebp+14h]
ii.. mov ecx,[WPARAM], shr ecx,16, mov [WPARAM_HIWORD],ecx
ii.. mov ecx,[WPARAM], and ecx,0ffffh, mov [WPARAM_LOWORD],ecx
ii.. mov ecx,[LPARAM], shr ecx,16, mov [LPARAM_HIWORD],ecx
ii.. mov ecx,[LPARAM], and ecx,0ffffh, mov [LPARAM_LOWORD],ecx
;
start.if
if.d '=',[MESSAGE], WM_CREATE, WM_CLOSE, WM_DESTROY
then.jmp W_.CREATE, W_.CLOSE, W_.DESTROY
end.if
jmp DEF_EXIT_CALLBACK
;������
W_.CREATE:
jmp DEF_EXIT_CALLBACK
W_.CLOSE:
jmp DEF_EXIT_CALLBACK
W_.DESTROY:
api PostQuitMessage,0
mov eax,0
jmp EXIT_CALLBACK
;����������
DEF_EXIT_CALLBACK:
api DefWindowProc, [WINDOW.Handle], [MESSAGE], [WPARAM], [LPARAM]
;��������
EXIT_CALLBACK:
pop edi
pop esi
pop ebx ;do not use the pop.d macro here
mov esp,ebp
pop ebp
ret
WndProc Parameters and Prologue Code:
To examine the procedure code itself, we first have the entry point, _WndProc@10h, which is called by Windows in the same way as Windows calls WinMain. Windows pushes four parameters onto the stack, with the call instruction return address being pushed on top of them. Then, as before, the base pointer address is saved by being pushed above the parameters and call return address, and the base pointer is moved to the top of the stack. The register values ebx, esi, and edi, are then pushed and saved onto the stack.
You can see that this operation at the start of WndProc is an identical prologue code to that used previously with WinMain.
Since, again, the parameters pushed onto the stack by Windows are underneath these other pushed values, they are again retrieved relative to the base pointer as [ebp+8], [ebp+12], [ebp+16], and [ebp+20].
The WndProc Message Code:
The four parameters passed by Windows to the WndProc code are the window handle, the message, and the two extra parameters associated with the message, that constitute what I have previously called the 'anatomy' of the Windows message.
The message passed by Windows is the message that was dispatched to Windows by the WinMain code DispatchMessage API function call, and the extra parameters are the other components of the MSG data structure used by WinMain, which are given the names wparam and lparam.
The WndProc code thus obtains four values: the [WINDOW.Handle] at [ebp+8], the [MESSAGE] value at [ebp+12], [WPARAM] at [ebp+16], and [LPARAM] at [ebp+20]. These values are retrieved immediately on entry to the WndProc code.
The code then splits up each of the values in WPARAM and LPARAM into a hiword and a loword, as Windows messages often use the parameters in this way. Mouse messages, for example, typically pass the current X and Y coordinate values of the position of the mouse cursor on the screen in the loword and hiword components, respectively, of LPARAM.
The code that extracts these components merits some explanation. The code which extracts the components of LPARAM, written in ordinary assembly language, is as follows:
mov ecx,[LPARAM]
shr ecx,16
mov [LPARAM_HIWORD],ecx
mov ecx,[LPARAM]
and ecx,0ffffh
mov [LPARAM_LOWORD],ecx
Notice the use of the 'and' instruction, which has to do with extracting only half of the information in a dword, as follows:
The 'and' instruction works in the same way as an 'and' gate, in that its dword software version associates all the bits of two dword binary numbers such that only if two corresponding bits are 1, the corresponding result bit will be 1, and 0 otherwise. Thus, if we 'and' two dword binary numbers:
1111111111111111 1111111111111111 0000000000000000 1111111111111111
the result will be:
0000000000000000 1111111111111111
which means that the 'and' instruction result has reduced the hiword of the first number to zero. Since the number
0000000000000000 1111111111111111 = 0ffffh
you can reduce the hiword of any dword to zero by 'anding' the dword with the number 0ffffh. This effectively extracts the loword out of the dword, and this was the purpose of the and instruction, 'and ecx,0ffffh'.
To extract the hiword out of a dword, you need only shift the whole dword to the right by 16, which moves the hiword into the loword position, obliterating the original loword, and filling the hiword with zeros.
This was achieved by using the shr ecx,16 instruction. A similar technique is applied in order to extract the hiword and loword out of WPARAM. Note that the LPARAM_HIWORD and LPARAM_LOWORD variables are dword variables containing word sized parameters.
This completes the message extraction part of the initial WndProc code. The message value must now be tested to see if it is one of those messages the program code is written to respond to.
This is done by comparing the message value, in turn, with each of the messages the program code responds to.
The if.d macro tests the value [MESSAGE] by comparing it, in turn, with each of the message values written on the same line. If the message is one of those values, the then.jmp macro jumps to the code label shown immediately below the relevant message.
If the message is not one of those the program will respond to, the if.d macro exists via end.if, and the message is sent back to Windows via the DefWindowProc API function for default processing, which may mean that it is simply discarded.
WndProc Program Code:
The program response code is contained in procedures like W_.CREATE, W_CLOSE, and so on, which can be inserted into the code as shown, or collected together in separate 'include' files. I refer to them here as 'procedures' although, in the above code, they are jumped to and not called, as is usually the case with procedures.
I refer to them this way because you can easily convert them into called procedures, but I won't complicate this introduction by dealing with this here. It is merely a matter of personal preference as to which way it is done.
For simplicity, the above code shows only three alternatives, WM_CREATE, WM_CLOSE, and WM_DESTROY, but you could have numerous other alternatives added across the page or, if they are too many, added via a number of separate if.d macro instructions listed down the page.
The nature of such alternatives will be determined by what the programmer wants the program to do. A word processor would respond to keyboard input by means of the WM_CHAR message, for example, so you would have a WM_CHAR alternative, coupled with a W_.CHAR procedure. It would be used to respond to a user pressing a key on the keyboard.
A WM_LBUTTONDOWN message, coupled with a procedure called W_.LBUTTONDOWN would be used to respond to a user pressing the mouse left button.
The WM_MOUSEMOVE message, coupled with a W_.MOUSEMOVE procedure, would be used, in response to movements of the mouse cursor, by a graphics editor, or a text editor for text highlighting purposes, and so on.
The actual code shown above does nothing, and sends all messages back to Windows via the DefWindowProdedure api (Def is short for 'default').
The above WndProc code can therefore be regarded as a kind of basic template, to which can be added message response code segments to create individual programs.
Exiting the WndProc Code, and returning to Windows:
When a response to a message is complete, the code has two alternative routes by which to exit the Callback procedure back to Windows: via either the 'EXIT_CALLBACK' or 'DEF_EXIT_CALLBACK' code addresses.
In the first case, the register eax must be set to 0, which is referred to as 'returning 0' in the Microsoft API reference. This is to tell Windows that the message has been dealt with and that the operating system should not implement any default processing of the message.
In the second case, exiting is via the address through which the DefWindowProc function is called (i.e. 'Default Window Procedure'), which allows the system to implement default processing of the message. In the above code, both W_.CREATE, and W_CLOSE exit in this way.
The option to return 0 in eax has the benefit of allowing the program code to intercept the system response to Windows messages.
For example, if the user clicks the window 'close' box, you can intercept the WM_CLOSE message and put a message box on the screen, asking the user whether or not to save changes to an open file.
If the user clicks the 'yes' or 'no' button in the message box, the code can either save changes to the file, or not, and then exit by calling the DefWindowProc function to allow the system to continue the process of closing the program. If, however, the user clicks the 'cancel' button in the message box, the code can jump to the exit code which returns 0, and the system will then not implement the process of closing the application. This thus gives the programmer the ability to exercise control over the default system response to user input messages.
The default system response to the WM_CLOSE message destroys the window and then sends a WM_DESTROY message to the window message loop to notify the program the window has been destroyed.
The program must then intercept the WM_DESTROY message and call the PostQuitMessage API function, in order to close the application.
PostQuitMessage sends a WM_QUIT message to the message loop, which causes the program to exit WinMain back to Windows, after calling the ExitProcess API function.
If WM_DESTROY is simply returned without calling PostQuitMessage, the actual program window is destroyed on the screen, but the program itself is still running, now without any window, and does not shut down, since the default response to WM_DESTROY does not send a WM_QUIT message to WinMain. Therefore, the program must respond to the WM_DESTROY message by calling the PostQuitMessage function, and then return 0, and exit via EXIT_CALLBACK, as shown.
PostQuitMessage has a single parameter, which can be any value. Whatever value is specified, however, is inserted by Windows into the [MSG+8] parameter of WinMain's MSG data structrue, and must be passed to the ExitProcess function, as shown in the WinMain code. The parameter is shown in the code as set to 0.
At the EXIT_CALLBACK code address, the Instruction Pointer moves through the WndProc so-called 'Epilogue' code, that pops the saved register values edi, esi, and ebx, back into those registers, and then moves esp and ebp stack pointers back to where they were before the WndProc Prologue code. These Prologue and Epilogue codes are identical in form to those used in the case of the WinMain procedure.
Note that, in the code shown, I have written the comment 'do not use the pop.d macro here'. This is because, as I discovered by a frustrating trial and error experience, the DefWindowProcedure API function returns a value in register eax that will be tested by Windows on return from WndProc. Since the pop.d macro uses register eax, it will change the value returned by DefWindowProcedure, and this can cause internal system errors in the default processing of messages.
After popping the values of the above three registers, the code moves the stack pointer back to coincide with the base pointer, ebp, pops the saved address of ebp into ebp, thus moving it back to where it was before Windows first pushed the parameters when calling _WndProc This leaves the top of the stack, and the stack pointer, esp, at the call instruction return address, so that the code can then return the Instruction Pointer to Windows via the final ret instruction.
PROGRAM DATA SECTIONS:
The Windows program code belongs to the code section of a program. All data used by a program, however, must be declared in one or another data section of the program, which is distinct from the code section. In NASM the code section is identified by being prefixed by the assembler instruction [section .text], as shown at the start of the Windows program code above.
NASM also provides for the existence of two data sections, identified by being prefixed by the NASM declarations [section .data], or [section .bss].
Initialised Data:
[section .data]: This section declares named data variables, or arrays, which are 'initialised'. That is, data is given permanent values that are saved onto the hard disk within the *.exe file. Such data values can be altered when the program is running, but will revert to the saved values next time the program is run. That is, the changes are not saved on closing the file. Data in this section is declared as follows:
[section .data]
Variable1 db 0
Variable2 dw 10
Variable3 dd 0ffffffffh
Array1 db 0,0,0,0,0,0,0,0,0...
etc.
db declares byte sized, dw, word sized, and dd, dword sized, variables or array elements.
Initialised data is most useful for declaring strings the program will use, such as the window class name, title, error messages, and any permanent strings the program will want to use.
In the basic program code, we have the class name and window title strings declared as follows (the strings are terminated in a zero, as is usually required by Windows):
WINDOW.ClassName db 'ClassA',0
WINDOW.Title db 'Template',0
The reason for terminating with a zero is that Windows reads the string characters, one by one, until it encounters a zero, which it takes to signify the end of the string.
It is possible also to use this section to create bitmap data for permanent features of a program window. These might be used to illustrate or define program specific toolbar buttons for example.
Uninitialised Data:
[section .bss]: This section declares named data variables, or arrays, which are not initialised. That is, the data is not given any permanent value saved onto the hard disk.
Data declarations in this section merely assign specified amounts of memory to named variables or arrays when the program is run. A disadvantage of initialised data is that it adds to the size of the *.exe file on the hard disk, whereas uninitialised data does not.
A 10kb (10 kilobyte, or 10000 bytes) initialised array would add 10kb to the size of the *.exe file, whereas a 10kb uninitialised array would not. Declarations in the .bss section are as follows:
[section .bss]
Variable.a resb 1
Variable.b resw 1
Variable.c resd 1
Array.a resb 0ffh
Array.b resw 0ffh
Array.c resd 0ffh
etc.
resb, resw, and resd declare byte sized, word sized, and dword sized individual memory variables or array elements respectively.
resb 1 does not initialise a byte to the value 1. resb means 'reserve the following number of bytes of memory when the program is run'. resb 1 thus means only 'reserve 1 byte', without specifying any value to which it must be set.
Array.a thus reserves a block of memory 0ffh, or 255 bytes in size. Array.c, however, reserves a block of memory 0ffh, or 255 dwords in size, which is the same as 0ffh x 4, or 255 x 4, which is 3fch, or 1020 bytes in size. The following declarations are thus equivalent:
Array.c resd 0ffh
Array.c resb 3fch
If you want an array in this section to be initialised, you have to write code to scan the required data into it when the program is run.
You could, for example, write a simple loop to scan zeros into an uninitialised array, in order to guarantee that all elements in the array were initially set to the value zero.
DECLARING EXTERNAL PROCEDURE NAMES:
API function, or procedure, names, defined outside a program's code, are defined in Windows *.dll library files, which contain the actual procedure codes. A program's code cannot simply call these functions, by means of their function names, since the assembler is not able to translate the names to address values in the program's code section, as is the normal case with procedure names
In order that a program might be able to call these function names, via a call instruction, they must be declared as external to the code. Just as WinMain, for example, had to be declared as GLOBAL, so that the name could be made available to the operating system, from outside the program, an outside procedure name the program wants to call has to be declared as 'extern' (for 'external'). Thus, where one program code declares a procedure name as global, to make it available externally, another program code must declare it as extern, in order to be able to make use of it.
All the Windows API functions names, used by a program, must be declared in this way. CreateWindowEx is an example of an API function, which is declared as follows:
[extern _CreateWindowExA@48]
_CreateWindowEx@48 equ _CreateWindowExA@48
Extern specifies the actual declaration. The equate that follows is a complication that exists for the following reason: Windows API functions that use text strings have two forms, depending on whether the strings are ANSI or UNICODE in nature. Those, like CreateWindowExA, that use ANSI character strings, have an 'A', as shown, but will have a 'W', as in CreateWindowExW, when using UNICODE character strings. The equate simply allows the form CreateWindowEx to be used, without reference to the A or W, as the default ANSI version of the function. API functions that don't use strings don't have A and W forms, and have an extern declaration alone, without an accompanying equate.
Part I: Part I Introduction
Chapter 1: Binary numbers, code, and procedures
Chapter 3: Assembly Language
Chapter 4: Assembly Language Code example
Chapter 5: Macros and HLA
Chapter 6: HLA code example
Chapter 7: The Windows operating system
Chapter 8: Data Structures
Chapter 9: How to Create a Windows Program
Chapter 10: How to Create an Exe File
Chapter 11: Structured Programming and OOP
Part II: Part II Introduction
Chapter 12: Debugging a Windows Program Code
Chapter 13: Painting the Window Client Area
Chapter 14: Creating Window Menus
Chapter 15: How to Create Toolbars
Chapter 16: How to Create Popup Menus
Chapter 17: About the Windows Clipboard
Chapter 18: How to Create Bitmaps
Chapter 19: Icons and the Ico Format
Chapter 20: Common Dialog Boxes
Chapter 21: Working with Files
Chapter 22: Scrollbars and Scrolling
Chapter 23: How to Send Data to the Printer
Chapter 24: Miscellaneous Topics
© Alen, June 2014
alen@alenspage.net
Material on this page may be reproduced
for personal use only.