CHAPTER 3
ASSEMBLY LANGUAGE:
Assembly Language Code, as previously encountered, is the language closest to the binary machine language actually fed to the CPU. Since machine code, consisting of binary numbers, could not be written directly by a programmer, all code instructions are therefore written in a readable form, using Assembly Language, and these are then translated into actual machine code, by an assembler, when the program is compiled.
Other programming languages, like C, for example, do not have a one-to-one relationship with machine code instructions, as Assembly Language does, because a single instruction, or statement, in such languages, will represent the equivalent of a block of Assembly Language code, involving more than one Assembly Language or machine language instruction. Since Assembly Language presents virtually a step-by-step representation of what is occurring within the CPU, due to its one-to-one correspondence with machine code, it gives a programmer a very good understanding of what the CPU is doing, and can do. This is not the case if one learns only some other language, like C, in which the individual instructions can appear only as if they were arbitrary rules to be followed. The resulting, poorer understanding of what ultimately underlies the code causes difficulties with innovation, debugging and problem solving.
To give a simple example of what this means: consider the declarations of variables in the C language and in Assembly language. In C, you might be told that unsigned variables can be of three kinds: unsigned char, unsigned int, and unsigned long; and that the maximum values of these are 255, 65536, and 4294967295 respectively. Then you may have to be told that assigning results from one variable type to another requires a statement declaring the size of the original variable, and that you should not move the value in a variable of larger maximum size into a variable of lesser maximum size. To someone learning C, without knowing Assembly Language, all this can be understood no better than as a set of apparently arbitrary rules that must be followed, the reason why being obscure.
Someone learning Assembly language, however, will have to be told about the 32-bit CPU registers that can be divided into 8-bit bytes, 16-bit words, and
32-bit dwords. It will also be explained that any such register, such as eax, for example, can thus be used as al, for byte values, as ax, for word values, and as eax, for dword values, and that these three can have maximum values of 255, 65536, and 4294967295, respectively, because these are the maximum values that can be counted by 8 binary bits, 16 binary bits, and 32 binary bits, respectively. The result is that variables in memory can be declared as byte sized, word sized, or dword sized, to correspond with the different possible register value sizes. The reason for any rule about moving values from one variable to another, which is to say, from one memory location into another will then be evident, since you can't move a 16-bit value, for example, into an 8-bit memory location, but can do the reverse.
The much higher degree of understanding involved in learning Assembly language thus means that, when something goes wrong, you can contemplate it in terms of what is actually happening, rather than in terms only of what apparently arbitrary rule might have been broken. If, afterwards, you do want to learn and use the C language, you will immediately recognise and understand what the rules mean, and why, and what the C code is actually telling the CPU to do. An understanding of Assembly Language thus helps the programmer to understand any other programming language, because he can recognise, in the individual statements in any such language, what sort of activity is going on at the CPU level. Indeed, a programmer who understands Assembly Language can virtually pick up a page of code in any language he has not before encountered and almost guess correctly what the code means. Perhaps I exaggerate a little, but the point made here is basically valid, and I do not hesitate to say that it is folly for any programmer not to be able to use Assembly Language, even if he intends to write code principally in some other language that might, perhaps, be seen by him as being more convenient and less detailed.
Such convenience, however, can also be associated with Assembly Language itself, since, as we shall see later on, Assembly Language can be enhanced by the use of macros to create statements similar to languages like C, thus making its use also less detailed and more convenient when desired. This text refers to codes for a set of macros designed to be used for this purpose.
ASSEMBLY LANGUAGE AND THE WINDOWS OPERATING SYSTEM:
In the modern programming environment, with Windows, Assembly Language is very easy to use, unlike previously. The greatest problem with Assembly Language before Windows was the necessity to use what are called 'interrupts' to communicate with the hardware, like the video screen etc. Different brands of hardware had different specifications, causing a nightmarish problem for a programmer who wanted to write code usable with all brands of hardware. This problem does not exist with Windows. The Windows operating system is set up to negotiate with all brands of hardware, and the programmer has to negotiate only with the one operating system, and no longer has to deal with hardware problems now taken care of by the operating system. Thus, instead of using interrupts to communicate with the hardware, like the keyboard, video screen, etc., the programmer uses the Windows API functions, which automatically deal with the different specifications of different brands of hardware.
Also, in the 32-bit environment of Windows, memory addressing uses only offsets and does not require manipulation of segment registers plus offsets, as was the case with 16-bit Assembly Language programming. The removal of such problems makes Assembly Language very easy to use in the Windows environment.
Assembly Language is also much more flexible than other languages in terms of the use of functions, or procedures. In Assembly Language, you can create multiple alternative entry points to and exit points from a procedure, if desired, whereas, in a high level language, you will have only the one entry and one exit point. This reduces the flexibility of the code, and will increase the size of the code by necessitating the use of separate procedures for what would be each alternative entry or exit point in an Assembly Language procedure, possibly containing virtually the same code.
ASSEMBLY LANGUAGE SYMBOL DEFINITIONS:
Symbols are used in a program's code to indicate memory locations, for data definitions, or code labels and function names. We have already seen how the label AddLengths was used to label the location of the start of a block of code. If the section of code is terminated in a ret instruction, the name is called a function name, or procedure name, whereas otherwise it merely labels a line in the code. The name, however, is also interpreted as the address of that line in the code. Thus, an instruction like mov eax,AddLengths, will put the address of the line labeled by AddLengths into eax.
Labels are also used to specify memory addresses, as we have seen with the labels LengthA and LengthB, etc. These have to be defined in the data section of the source file, and have to indicate the amount of memory to be assigned to them, as follows:
[section .data]
LengthA db 0
or
LengthA dw 0
or
LengthA dd 0
to specify a byte, word or dword sized memory allocation, set to 0. You can also specify actual values, if desired, instead of setting the value to 0, as follows:
LengthA db 10
You can also use the db instruction to assign any number of bytes as, for example:
Lengths A db 10,11,25,14,9,0
The commas here separate the individual byte assignments, and the 0 at the end is inserted as a marker so that a program code can identify the end of the series.
You can also use this method to define a string of text characters, which might be some fault message the program can call if necessary as, for example:
ErrorString db 'Maximum value exceeded',0
Once again the zero is used as a marker for the
program code to identify the end of the string. Note that the text string must be within inverted commas, which identifies the string as text, and that, in this case, it is not necessary to separate the individual text characters with commas, as would be necessary with ordinary numbers.
There are, in fact, two distinct data sections, one called data and the other called bss, as follows:
[section .bss]
LengthA resb 1
or
LengthA resw 1
or
LengthA resd 1
The difference is that values specified in the data section are saved as part of the file on the hard disk, whereas those specified in the bss section are not. resb, which is short for 'reserve byte', means 'reserve a byte sized memory allocation' in RAM, when the program is running, but not in the file on the hard disk. Memory specified in the data section increases the size of the file on the hard disk, and occupies more hard disk space, and should thus be used only for memory allocations where it is desirable to save actual values to the file, such as message strings, or whatever.
We have seen that code labels are defined at the line of code to which they refer. But what about function labels for code outside the program code, such as API function names? These have to be defined in the source code in a way that declares them to be external to the program code. The API function ShowWindow, for example, is defined as follows:
[extern _ShowWindow@8]
This is purely a label definition, and not any kind of memory assignment. The extern directive defines the symbol _ShowWindow@8 as being external to the program code, and is necessary to enable the function to be called from within the program code. The '_' and '@8' have to do with API function specifications. We will see more about these kinds of label definitions in a later chapter.
THE STACK - A SPECIAL SET OF MEMORY LOCATIONS:
Here we must become acquainted with an important section of RAM, which is not accessed by the normal method of specifying memory addresses, via symbol names. It is accessed, instead, by the use of the special code instructions 'push' and 'pop'. This memory is referred to as the 'stack', and is intended for temporary storage of values the CPU is working on, when there are more values being manipulated than the CPU can handle with its limited number of registers like eax, ebx, etc.
The reason why the normal method of specifying memory addresses is not used is that the stack has a special register, called the stack pointer, that always contains the address of the 'top' of the stack. There is thus no need to specify this address, as the push and pop instructions are always automatically related to this special register.
Each value to be stored is simply 'pushed' onto the top of the stack, and the stored values are 'stacked' on top of one another in a 'stack' of contiguous memory locations (hence the name 'stack'). To retrieve the values, they have to be 'popped' off the
top of the stack, one after the other, and thus automatically correspond to the reverse of the order in which they were originally pushed. The address contained within the stack pointer register, esp, is automatically decremented or incremented with each push or pop instruction.
The stack also has a second special register, exclusive to itself, called the base pointer, ebp, which is not associated with the push and pop instructions, and is used to access values anywhere within the stack, without reference to the stack pointer, which always points to the top of the stack only. We will see that the stack is extensively used for communication between a program code and the Windows operating system code.
A final point is that the stack is actually upside down. That is, the address of the top of the stack doesn't increase when a value is stacked, or pushed, on top of it, but decreases. That is, the 'top' of the stack moves downwards in its address space, rather than upwards, as one might expect, which is why I refer to the stack as 'upside down'.
ASSEMBLY LANGUAGE CODE INSTRUCTION SET:
There are 30 different Assembly Language instructions a programmer will require, by means of which virtually any kind of program can be written. Additional, more sophisticated instructions represent only actions that can be carried out with several of the more basic instructions. You can therefore create any Assembly Language program without knowing anything about such additional instructions. The 30 instructions provide the programmer with a complete understanding of Assembly Language, and the ability to write any kind of program code. Below is a description of the meaning and use of each of the 30 basic instructions, several of which we have already encountered earlier on.
Semi-colons inserted into the code allows the insertion of a commentary into the code, to help the programmer understand what the code means, when re-reading it later on. Each instruction occupies a single line in the source code, and the assembler will create a fault message if anything appears, anywhere, on any line, that it does not recognise as an instruction, or part of an instruction. If you insert a semi-colon, however, the assembler will ignore anything, on that line only, that follows the semi-colon, and will not report it as a fault. Thus, you can use semi-colons to insert a helpful commentary into your code source. An example is as follows:
LengthA db 10 ;length in metres
The 30 Code Instructions:
mov
short for 'move'. It means 'move a value into' some destination, without changing the value in the source. That is, it really means 'copy a value into'. However, it is written as mov. Examples of its use, as illustrated previously, are:
mov eax,10
or
mov eax,ebx
or
mov eax,LengthA
or
mov eax,[LengthA]
or
mov [LengthA],eax
but
mov LengthA,eax - wrong.
The last one is wrong because Length A, not in brackets, refers to the memory address of Length A, and not its contents. Since the memory is assigned by the operating system, you can't change its value with your code and any attempt to do so will be a fault. eax and ebx are basic CPU registers, or 32-bit arrays, which it uses to work on calculations.
jmp
short for 'jump'. It means 'jump to another part of the code'. The destination of the jump can be any line of the code that has a label. So you write the instruction as
jmp Label
You could also do the following:
jmp [CodeAddress]
where CodeAddress is a variable containing an address of any line in the code. If it contains a memory address, however, you will get an invalid address fault. The jmp instruction is not normally used in this way, but it can be, if required
call
the same as jmp, except that it must always be used with the 'ret' instruction. As indicated previously, you 'call' a block of code that starts with a label name and ends with a 'ret' instruction. At the ret instruction the instruction pointer jumps back to the line of code that follows just after the call instruction. As with the jmp instruction, you write the instruction as:
call Label
or
call [CodeAddress]
As with the jmp instruction, however, the second form is possible, but not the normal use of the call instruction
ret
always used to terminate a section of code that is intended to be called by the call instruction.
push
push a value onto the top of the stack.
pop
pop a pushed value back off the top of the stack.
pushad
a special push instruction that pushes all the values in the cpu registers onto the stack one after the other (eax, ecx, edx, ebx, esp, ebp, esi, edi).
popad
a special pop instruction that pops values off the stack into the all the cpu registers, one by one, in the reverse order to that of pushad. It is thus intended as the reverse of the pushad instruction. These two instructions can be very useful, as follows: if you wanted to call a function, which would use a variety of cpu registers, but also wanted to preserve the original values of the cpu registers, you could code the following:
pushad
call Function
popad
The pushad instruction saves the register values and popad restores them all to what they were before the call, regardless of how the called function might have altered them
cmp
short for 'compare'. It means 'compare with' as in the following example which means 'compare the value in eax with the value in ebx'
cmp eax,ebx
In general, you can have:
cmp eax,10
or
cmp eax,ebx
or
cmp eax,LengthA
or
cmp eax,[LengthA]
or
cmp [LengthA],eax
or
cmp LengthA, eax ???
But
cmp 10,eax - wrong, you can't have an 'immediate' or specified value as the first operand in the instruction?????????????????
The following six instructions are variations on the jmp instruction which are used in conjunction with the cmp instruction. They are all written in the same way as the jmp instruction, i.e., je Label, jne Label, jb Label, etc., and are all variations on 'jmp if...' That is, you make a comparison and then jump, if the result is whatever, as follows (we will use the above example cmp eax,ebx):
je
means 'jmp if equal'. Using the example: jmp if eax is equal to ebx
jne
means 'jmp if not equal'. In the example: jmp if eax is not equal to ebx
jb
means 'jmp if below'. In the example: jmp if eax is below, or less than, ebx
jnb
means 'jmp if not below'. In the example: jmp if eax is not less than ebx'
ja
means 'jmp if above'. In the example: jmp if eax is above, or greater than ebx'
jna
means 'jmp if not above'. In the example: jmp if eax is not greater than ebx'
Thus, to use the example, we might write:
cmp eax,ebx
jna Label
so that the Instruction Pointer jumps to the code line called 'Label' if eax is not greater in value than ebx. If eax is greater than ebx, the Instruction Pointer simply continues to the next line of code, and the 'jna Label' instruction does nothing. Similarly for the other versions of the conditional jmp instruction. Thus the programmer has a variety of methods to use in comparing one value with another, and will use them often.
Note that there is a peculiarity in NASM, in using je, jne, etc., in that you may get a 'short jump out of range' fault. This is because, with NASM, you can jump only a limited distance in the code with these instructions. This problem can be overcome by writing the instructions in the form 'je near', 'jne near', etc., which tells NASM to override the short jump restriction. To save problems, you can have a policy to always write the instructions in the 'near' form. This problem occurs only with the conditional forms. It does not apply to the simple jmp instruction.
nop
means 'no operation'. This is an instruction that does nothing.
add
means what it says. add eax,ebx means add ebx to eax, with the result in eax, and no change in ebx. In general, you can have:
add eax,10
or
add eax,ebx
or
add eax,LengthA
or
add eax,[LengthA]
or
add [LengthA],eax
or
add [LengthA],byte 10
or
add [LengthA],word 10
or
add [LengthA],dword 10
but
add LengthA,eax - wrong, you can't change the value of a symbol address.
add 10,eax - wrong, you can't change an immediate value.
The byte, word, and dword alternatives above are necessary when adding an immediate value to a memory location, because NASM allows the use of different sized memory locations, and therefore doesn't automatically know how much of a memory location you want to use. If you don't specify it, you
will get an 'operation size not specified' fault. With forms like mov [LengthA],eax, or mov [LenghtA],ax, this is not necessary, because eax and ax automatically specify dword and word values respectively.
adc
means 'add with carry'. If you add a number which overflows a register, for example, you need to carry a 1, because the number is too large for the CPU to register. What it does, instead, is to set the 'carry flag', to indicate the overflow. If, for example, you use two registers to store such a large number, you can carry the 1 to the second register by using adc instead of the normal add instruction, and the 1 will be automatically added, if it exists. This instruction is otherwise the same as the add instruction.
sub
means subtract. sub eax,ebx means subtract ebx from eax, with the result in eax, and no change in ebx. In general, you can have:
sub eax,10
or
sub eax,ebx
or
sub eax,LengthA
or
sub eax,[LengthA]
or
sub [LengthA],eax
or
sub [LengthA],byte 10
or
sub [LengthA],word 10
or
sub [LengthA],dword 10
but
sub LengthA,eax - wrong, you can't change the value of a symbol address.
sub 10,eax - wrong, you can't change an immediate value.
sbb
means 'subtract with borrow� This relates to the sub instruction similarly to the way adc relates to the add instruction. If you subtract a larger number from a smaller, you will need to borrow a 1. As before, if you use two registers as if to make a much larger number than one alone, and a subtract operation on the smaller number register indicates that a 1 must be borrowed from the second register, the sbb instruction will subtract the 1, if it exists. The sbb instruction is otherwise the same as the sub instruction.
inc
means 'increase by 1' or 'add 1 to�' Thus, you can have:
inc eax
or
inc byte [LengthA]
or
inc word [LengthA]
or
inc dword [LengthA]
but
inc LengthA - wrong, you can't change the value of a symbol address.
inc 10 - wrong, you can't change an immediate value.
As before, the byte, word, or dword specifications are necessary in the case of the contents of a memory location.
dec
means 'decrease by 1' or 'subtract 1 from�', and has an identical syntax to that of the inc instruction, such as dec eax etc.
mul
Means multiply This instruction is less straightforward than others, because it makes use of special register arrangements, as follows: mul always multiplies the value existing in the two registers edx:eax. Here edx:eax work together as if they were one 64-bit register, with edx containing the higher value part of the number. If you don't have a number larger than 32 bits, you must set edx to zero, and put the number in eax, and then multiply it by a value. This is done by the instruction 'mul value', as follows:
mul ebx
or
mul 10
or
mul [LengthA]
or
mul LengthA
or
mul eax
squares the value in eax
It is possible to create a byte sized multiplication, without using register edx. The number to be multiplied is put in al, and the result appears in ax
div
means divide. As with the mul instruction, the div instruction also makes use of special register arrangements, again involving registers eax and edx. The number that is to be divided is put into edx:eax, considered as together making up one 64-bit number, with edx being the higher part of the number. If the number fits into eax alone, edx must be set to zero. When the number is divided, the result is put into eax and any remainder is put into edx. Again, if the division is byte sized, the number can be put into ax, without using register edx, and the result will be in al, with the remainder in ah. The div instruction syntax is similar to that of mul, in that the value to be divided is assumed to have been placed in edx:eax, as follows:
div ebx
or
div 10
or
div [LengthA]
or
div LengthA
shl
means 'shift left'. This instruction shifts all bits of a binary number to the left by a specified number of steps, meaning towards the higher value end of the number, and fills the vacated bits on the right with zeros. The syntax is as follows:
shl ebx,1
or
shl ebx,2 or 3 etc.
or
shl ebx,cl
or
shl [LengthA],byte 1
or
shl [LenghtA],word 1
or
shl [LengthA],dword 1
If, for example, we have the number
eax: 00000000000000000000000000000011
then the instruction
shl eax,1
will give the number
eax: 00000000000000000000000000000110
The binary number 11 is 3, and the binary number 110 is 6, so that we see that shifting a binary number left by 1 always multiplies the number by 2. Thus shl eax,2 would multiply the number by 4, and so on, which can be a very useful feature of this instruction to remember.
The byte, word, and dword forms, shown above, are required in order to tell NASM how many bits in a memory location are to be shifted, since NASM allows these different alternatives.
shr
means 'shift right'. This instruction is the opposite of shl, and shifts all bits of a binary number to the right, towards the lower value end of the number, filling the vacated bits on the leftmost end with zeros. The syntax, or rule for using shr, is identical to that for shl. Similarly, as shl,1 multiplies a binary number by 2, shr,1 divides a number by 2. So shr,2, 3, etc. divides a number by 4, 8, etc.
lea
means 'load effective address' or 'get the address of�'. This could appear irrelevant in the sense that we already know that a memory address is specified by a symbol name, such as LengthA in the examples given before. Thus, mov eax,LengthA will put the address of LengthA into eax, apparently making an instruction like lea irrelevant. There is a situation, however, where this will not work.
Suppose you have a large memory block called, for example, ArrayA, and you want the address of ArrayA+20, or ArrayA+ebx, or whatever. You can code mov eax,ArrayA, and then, add eax,20, or add eax,ebx. You cannot simply code mov eax,ArrayA+20, and this is where the lea instruction becomes useful, because you can code
lea eax,[ArrayA+20]
to get the address of ArrayA+20 in eax.
The following three instructions make use of the relationships of binary numbers that arise naturally out of the working of transistor based gate circuitry (see the section on CMOS logic circuitry). It has been found to be useful to make use of these hardware properties as coding instructions. I describe what the instructions do by showing how they modify binary numbers, as they do within the hardware itself.
or
written as
or eax,ebx
eax: 00000000000000000000000000111111
ebx: 00000000000000000000001111110000
eax: 00000000000000000000001111111111
'or' output selects an output bit as 1 if either of the corresponding input bits is one (i.e. 'if one or the other, or both, of the inputs is 1, then the output is 1'). or eax,ebx carries out this operation and puts the result in eax, as shown on the last line in the example above.
xor
written as
xor eax,ebx
eax: 00000000000000000000000000111111
ebx: 00000000000000000000001111110000
eax: 00000000000000000000001111001111
'xor' output selects an output bit as 1 if the input bits are not the same (i.e. 'if one or the other input, but not both, is 1 then the output is 1')
and
written as
and eax,ebx
eax: 00000000000000000000000000111111
ebx: 00000000000000000000001111110000
eax: 00000000000000000000000000110000
'and' output selects an output bit as 1 if both input bits are 1 (i.e. 'if both one and the other are 1, then the output is 1')
THE CPU REGISTER SET:
Assembly Language, as mentioned before, has a direct relationship with the individual operations of the CPU. We have already encountered 32 bit array names like eax and ebx, etc., normally called 'registers', which are the names of actual arrays in the CPU, which the CPU uses to hold the values it is actually working on, and it manipulates those values in accordance with the particular Assembly Language instructions given in the list above. The other main activity of the CPU is to negotiate with RAM, an associated memory bank, where it can store and retrieve large numbers of values not immediately being worked on. The CPU also has input and output connections to the hardware but, in the case of Windows, these are used directly only by the operating system and not by a program's assembly language code. There are only 6 main registers in the CPU, so that, if a large amount of data has to be worked on, it has to be stored in RAM so that the CPU can progressively work through it, retrieving only a few values at a time. The negotiation of the CPU with RAM memory locations is represented, in Assembly Language, as we have seen, by the use of memory address names, in the form LengthA, LengthB, etc., for the actual memory locations, and in the form [LenghtA], [LengthB], etc., for the the contents stored in those memory locations. In other languages, all these details are, in effect, hidden from the programmer and obscured by the structure of the language.
The 6 main CPU registers, for use with the above Assembly Language instructions, are:
eax, ebx, ecx, edx, esi, edi
These are the ordinary registers used for holding the numbers being used in calculations. We have also come across the following special purpose registers:
esp, ebp, eip
esp is the stack pointer register, which always points to, and defines, the 'top' of the stack, and has a special relationship with the push and pop instructions, as we have seen. ebp, the base pointer, is also a special stack register that can be used to access locations within the stack, independently of esp, or the push and pop instructions.
eip is the Instruction Pointer register, which contains the address of the code instruction currently being fed to the CPU. It is always, then, automatically incremented to the next code instruction. It is directly manipulated only by the call, ret, and jmp instructions, and by the various conditional jump instructions. These cause the instruction pointer to jump back and forth to different locations within the code, including the operating system code, so that the instruction pointer never runs off the end of all the code, until the system is finally shut down.
The main registers, used in calculations, are 32 bit
registers, but can be subdivided, so that only part of a register may, if desired, be used by a particular instruction.
The available subdivisions are as follows:
For register eax:
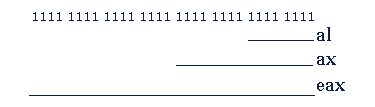
Here al is 8 bits, or one byte; ax is 16 bits, or one word, or two bytes; eax is 32 bits, or one dword, or two words, or four bytes.
In writing Assembly Language instructions, the programmer has the choice of writing, for example
mov al, 10 - a byte instruction, or
mov ax,10 - a word instruction, or
mov eax,10 - a doubleword (dword) instruction
so you have the choice of working directly in bytes, words, or doublewords. These choices are available with the four registers, eax, ebx, ecx, and edx, as follows:
eax, ax, al
ebx, bx, bl
ecx, cx, cl
edx, dx, dl
In the case of registers esi and edi, only two choices are available:
esi - (32 bits, or doubleword), or
si - (16 bits, or one word), or
edi - (32 bits, or doubleword), or
di - (16 bits, or one word)
We also have the two special stack registers, mentioned in the section describing the stack, the stack pointer, esp, and the base pointer, ebp, which can have the forms:
esp - (32 bits, or doubleword), or
sp - (16 bits, or one word), or
ebp - (32 bits, or doubleword), or
bp - (16 bits, or one word)
sp and bp are relevant, however, only for 16 bit code. 32 bit Windows code, therefore, always uses the esp and ebp forms, because these always contain memory addresses, which are 32 bit values.
The byte and word forms of registers can be used in the case of registers like eax, with 32 bit code, to hold values being used in calculations. If used to contain memory address values, however, the 32 bit forms of the registers must be used.
Part I: Part I Introduction
Chapter 1: Binary numbers, code, and procedures
Chapter 3: Assembly Language
Chapter 4: Assembly Language Code example
Chapter 5: Macros and HLA
Chapter 6: HLA code example
Chapter 7: The Windows operating system
Chapter 8: Data Structures
Chapter 9: How to Create a Windows Program
Chapter 10: How to Create an Exe File
Chapter 11: Structured Programming and OOP
Part II: Part II Introduction
Chapter 12: Debugging a Windows Program Code
Chapter 13: Painting the Window Client Area
Chapter 14: Creating Window Menus
Chapter 15: How to Create Toolbars
Chapter 16: How to Create Popup Menus
Chapter 17: About the Windows Clipboard
Chapter 18: How to Create Bitmaps
Chapter 19: Icons and the Ico Format
Chapter 20: Common Dialog Boxes
Chapter 21: Working with Files
Chapter 22: Scrollbars and Scrolling
Chapter 23: How to Send Data to the Printer
Chapter 24: Miscellaneous Topics
© Alen, August 2013
alen@alenspage.net
Material on this page may be reproduced
for personal use only.