CHAPTER 21
WORKING WITH FILES.
OVERVIEW:
There are a number of different tasks to be considered when working with files: creating files; opening and closing files; reading from and writing to files; searching the contents of files and locating a position within a file; creating a save changes
message box when the user closes an application; and providing the user with system file open and file save dialog boxes. In the following sections we will deal with these topics one after the other.
OPENING OR CREATING FILES:
The basic API function used to either open existing files, or create files that don't exist, is CreateFile, which is called as shown below.
Except for the first, all the parameters consist of a variety of flags that specify the possible different characteristics that can be associated with the file. These indicate whether the file is to be readable
and/or writable, whether or not it is to be sharable, the conditions and manner of its creation, its attributes and security attributes. Only three of the flag parameters are inserted in the example below, with the others being set to zero. The three are sufficient for ordinary operation of files, and we will examine only these here.
api CreateFile, FILE.SelectedFile, GENERIC_WRITE|GENERIC_READ, 0, 0, OPEN_ALWAYS, FILE_ATTRIBUTE_NORMAL, 0
mov [FILE.Handle],eax
GENERIC_WRITE | GENERIC_READ flags specify that the file can be both read from and written to. It is possible to use only one of these to open a file in a read-only or write-only manner.
The OPEN_ALWAYS flag specifies that the file is to be opened if it exists, and created if it does not. Alternatives for this flag include OPEN_EXISTING, which specifies that the file is to be opened only if it already exists. If it does not exist, the function fails, and returns 0 instead of a file handle.
TRUNCATE_EXISTING is a flag that specifies the same as the OPEN_EXISTING flag, except that the file contents are truncated to zero bytes (i.e. deleted).
FILE_ATTRIBUTE_NORMAL specifies the normal, or default attributes for the file. Other possibilities
are FILE_ATTRIBUTE_ARCHIVE, along with FILE_ATTRIBUTE_HIDDEN, the meanings of which are self-explanatory, and there are also some others.
For a full description of all possible flags, the reader should consult the Microsoft online documentation for the CreateFile API function. What is described here relates to the normal and straightforward operations with files.
The CreateFile first parameter, shown above, is FILE.SelectedFile, which is the address of a zero terminated string that specifies the path and filename of the file to be opened or created.
If the function succeeds in either opening or creating the file, eax returns the handle of the open file.
THE FILE POINTER:
Once a file is open, the user will want to read from it or write to it, and these options require the use of the ReadFile and WriteFile API functions. First, however, it is necessary to understand what the File Pointer is, and how to manipulate it.
The File Pointer is a system pointer that points to a location within an open file. That is, it points to some address within the contents of the file, which will be the address at which any read or write operations will begin.
The File Pointer location must be set, so that the system will know where to begin reading from or writing to the file. This is done by calling the SetFilePointer API function, which moves the file pointer back and forth within the file contents. The SetFilePointer function always tells the file pointer to move from one location to another, beginning with a selected starting position.
Here we encounter another of those potentially frustrating and time wasting difficulties a reader who is new to the API function documentation can experience. There is no API function available to simply set the file pointer at a particular location in the file, without moving it from one position to another, even if you don't know where the file pointer is currently located, and don't therefore know from where it must be moved. This can potentially cause considerable, time-wasting puzzlement in an attempt to understand how to set the file pointer, without moving it from one location to another. The answer, however, is simply that, to set the file pointer at a particular position, such as at the start of the file, you have to tell the SetFilePointer function to 'move' a distance of zero bytes from the specified location, such as from the start of the file to the start of the file.
An example of the use of the SetFilePointer function is as follows (I use ecx only so that I can write the api call on one line):
mov ecx,[FILE.POINTER.MoveDistance]
api SetFilePointer, [FILE.Handle],ecx,0,FILE_BEGIN
[FILE.POINTER.MoveDistance] is a parameter that specifies a distance in bytes that the file pointer is to be moved into the file contents, starting from the beginning of the file, as specified by the flag FILE_BEGIN. This operation succeeds whether or not the file pointer was previously set, because the whole operation is entirely specified by this one call. Thus, to simply set the file pointer to the beginning of the file, we will have:
api SetFilePointer, [FILE.Handle],0,0,FILE_BEGIN
Here, the file pointer is instructed to move a distance of zero bytes from the start of the file to the start of the file.
The [FILE.POINTER.MoveDistance] parameter can specify a distance to move with a maximum value of 0ffffffffh/2, or 2 gigabytes, an enormous file size, which would never be normally encountered. However, by including the next function parameter, this size can be increased to a maximum that can be even larger, allowing for operations on files of gigantic size. For normal operations, the next parameter is therefore always set to zero. Alternatives to the flag FILE_BEGIN are FILE_END, which specifies that the file pointer is to be moved a distance backwards, starting from the end of the file, and FILE_CURRENT, which specifies that the file pointer is to be moved from its current position as the starting point.
Here we can see that the file pointer can obviously potentially be specified to move in two directions: either forwards, towards the end of the file, or backwards, towards the beginning of the file. To achieve this, the [FILE.POINTER.MoveDistance] value is a positive number to specify a forward move, and a negative number to specify a backward move.
We already know that specifying negative numbers involves an interpretation of positive numbers, by dividing the range of dword values (i.e. numbers up to 0ffffffffh) into two, and using the upper half, above 80000000h, inclusive, as negative numbers, and those below 80000000h as positive numbers. This interpretation is used by the operating system, and is why the maximum distance to move was specified above as 0ffffffffh/2. The documentation, however, specifies that files of 0ffffffffh bytes in size can be worked with. I don't know whether or not this means that one can move forward from the beginning of the file by an amount up to 0ffffffffh, by using the flag FILE_BEGIN. However, I have never tried working with a file of the order of 2 gigabytes, or larger, in size.
To convert a number to a negative number, you can simply subtract it from zero. Thus, you could code:
mov ecx,0
sub ecx,100h
api SetFilePointer, [FILE.Handle],ecx,0,FILE_CURRENT
This would move the file pointer 100h bytes backwards, towards the beginning of the file, from the current position of the file pointer.
The return value from the SetFilePointer function, in eax, is the value of the file pointer, but this is not really useful, since the flags always specify how to move the pointer, and the file read and write operations automatically use the file pointer value. It can, however, be used to test for a value of 0ffffffffh, which means that the function call has failed.
READING FROM FILES:
Once the file pointer is at a position in the file, the ReadFile and WriteFile API functions can be used.
The following is an example of opening a file and then
reading the full contents into a memory buffer, and shows the necessary sequence of function calls:
api CreateFile, FILE.SelectedFile, GENERIC_WRITE+GENERIC_READ, 0, 0, OPEN_ALWAYS, FILE_ATTRIBUTE_NORMAL, 0
mov [FILE.Handle],eax
api GetFileSize,[FILE.Handle],0
mov [FILE.Size],eax
jmp.if.d '!>',[FILE.Size],0, .skip_read
api SetFilePointer,[FILE.Handle],0,0,FILE_BEGIN
api ReadFile,[FILE.Handle],FILE.Bfr,[FILE.Size],FILE.BytesRead,
.skip_read:
api CloseHandle,[FILE.Handle]
Here, the file is first opened, and then the file size is obtained, using the GetFileSize function.
If the file size is zero, the read operation is bypassed in the above code. Otherwise the file pointer is set to the beginning of the file, and the contents of the file are read into the buffer address, FILE.Bfr, by the ReadFile API function. The CloseHandle function must be called to close the file, unless it is to be left open for further read or other operations.
It appears to be possible to open a file and begin to read or write to it without setting the file pointer, on the assumption that the file pointer will automatically be set to the beginning of the file. However, experiences of problems with assumptions like this have led me to adopt the policy of always overtly setting the file pointer, whether necessary or not. Of course, if you want to append data to a file, starting at the end of the data currently in the file, it is imperative to call SetFilePointer, with the flag FILE_END
The GetFileSize function requires only the file handle. The second parameter is used only for enormous files, and is therefore otherwise always set to zero.
ReadFile reads the number of bytes indicated by
[FILE.Size] into the address FILE.Bfr. The number of bytes can, of course, also be any number less than the full size of the file.
The read operation is, of course, really only a copy operation, which copies the data from the hard disk, where the file is stored, but does not remove the data being read.
The API function records the total number of bytes actually read and puts this number into the FILE.BytesRead variable. The value returned in eax is 1, if the operation is a success, and 0 for failure. If the number of bytes read is zero, and eax is 1, the file was truncated, without moving the file pointer, thus leaving the file pointer beyond the end of the file.
When the read operation is complete, the file pointer is automatically adjusted by the number of bytes actually read, as contained in [FILE.BytesRead]. That is, the file pointer is moved to the next byte beyond the last byte actually read. For example, if the file pointer is pointing to x in xyzw, and you read the three bytes xyz, the file pointer will be moved three bytes to point to w. In this way you can easily carry out a series of contiguous read operations without adjusting the file pointer each time, since this is done automatically.
SEARCHING FOR DATA WITHIN A FILE:
The read operation can be used to find the location of a particular item of data, such as a heading, or whatever, within a file
Suppose, for example, you want to find the word 'Data', which is expected to be somewhere within the
file. You can use a loop to iterate through the file, byte by byte, until you locate the required word, as follows (I assume the file has already been opened, and the file pointer set to the beginning of the file, and the size of the file has been obtained in [FILE.Size]):
ii.. mov esi,FILE.Bfr, mov edx,0
until.d '=',[esi],'Data'
or.until.d '>',edx,[FILE.Size]
api ReadFile,[FILE.Handle],esi,4,FILE.BytesRead,0
api SetFilePointer,[FILE.Handle],0fffffffdh,0,FILE_CURRENT
inc edx
end.until
Here, 4 bytes, corresponding to the 4 bytes in 'Data' are read into esi, a buffer address, each time, and compared to the value 'Data', to see if the two correspond. Since we want to iterate through the file data byte by byte, but the file pointer is automatically adjusted by 4 bytes each time, we have to move it
backwards 3 bytes each time in order that it effectively moves forward by only one byte each time. The SetFilePointer function, with the 'bytes to move' parameter set to 0fffffffdh, or -3, moves the file pointer backwards 3 bytes each time, thus achieving the desired result.
WRITING TO FILES:
Writing to a file is more or less the reverse of the read operation, but you will need to be careful if you want to avoid altering the data already in the file. The write operation writes data forward from the current position of the file pointer and overwrites any data already existing beyond this position, as far as the write operation extends. Thus, as mentioned before, if you want to append data to a file, without altering the already existing data, you have to first set the file pointer to the end of the file, as follows:
api SetFilePointer, [FILE.Handle],0,0,FILE_END
The following code demonstrates opening a file and saving the contents of a buffer to the file, which indicates the necessary sequence of function calls. In this case, the already existing data within the file is completely replaced, by first truncating the file to zero, and then writing the new data from the memory buffer. This code would apply when a user wanted to save the changes to an entire file:
api CreateFile, FILE.SelectedFile, GENERIC_WRITE+GENERIC_READ, 0, 0, OPEN_ALWAYS, FILE_ATTRIBUTE_NORMAL, 0
mov [FILE.Handle],eax
api SetFilePointer, [FILE.Handle],0,0,FILE_BEGIN
api SetEndOfFile,[FILE.Handle]
api WriteFile,[FILE.Handle],FILE.Bfr,[FILE.Size],FILE.BytesWritten,0
api CloseHandle,[FILE.Handle]
Once the file has been opened, the file pointer is set to the beginning of the file. The SetEndOfFile function is then called. This defines the end of the file to be the current position of the file pointer, whatever the end of the file might have been previously.
Since, in the present example, the file pointer has been set to the beginning of the file, the SetEndOfFile function effectively truncates the contents of the file to zero bytes. The WriteFile function then writes data, of a quantity in bytes specified by [FILE.Size], from the FILE.Bfr to the
file on the hard disk, starting at the current position of the file pointer. It also records the total number of bytes actually written to the file to the variable address, FILE.BytesWritten.
Again, as with the read operation, the file pointer is automatically adjusted, by the WriteFile function, to a position at the end of the data written, so that you can carry out a series of contiguous write operations without having to move the file pointer each time.
INSERTING DATA INTO A FILE:
Suppose you want to insert data at a particular location within the file, without any of the existing data, starting at that location, being overwritten. To do this, you have to first move all the data beyond that location forward in the file to create a gap, or space, of sufficient size to accommodate the new data to be written at that location. The same result
can be achieved more easily by reading all the data between the particular location and the end of the file, into a buffer. The new data can then be written to the file, and the saved data, from the buffer, can then be written back into the file, after the end of the new data.
CREATING A 'SAVE CHANGES?' MESSAGE BOX:
When the contents of a file have been downloaded to a buffer to work on, and the user has modified them, it is necessary to provide an opportunity for the user to decide whether or not to save the changes back to the file on the hard disk.
To do this, it is necessary to provide a message box with 'Yes', 'No', and 'Cancel' options, so that the user can decide to save the changes, and close the file, to not save the changes, and close the file, or to abort
the decision and leave the file open, and return to do further work on it.
The message box will need to be provided in response to a window WM_CLOSE message, sent when the user clicks the window 'close' box, or selects 'exit' from a menu.
An example of the code for all this is as follows:
W_.CLOSE:
jmp.if.d '!=',[FLAG.FileChanged?],Yes, .CloseFile
push.d [MESSAGE],[WPARAM],[LPARAM]
mov ecx,MB_YESNOCANCEL+MB_ICONQUESTION+MB_SYSTEMMODAL
api MessageBox,[WINDOW.Handle],MB.Text,MBTitle,ecx
mov [FLAG.MsgBox],eax
pop.d [LPARAM],[WPARAM],[MESSAGE]
start.if
if.d '=', [FLAG.MsgBox], IDYES, IDNO, IDCANCEL
then.jmp .SaveAndCloseFile, .CloseFile, .Cancel
end.if
;------------------
.Cancel:
xor eax,eax
jmp EXIT_CALLBACK
;---------------
.CloseFile:
jmp.if.d '=',[FILE.Handle],0,DEF_EXIT_CALLBACK
api CloseHandle,[FILE.Handle]
mov [FILE.Handle], dword 0
jmp DEF_EXIT_CALLBACK
;--------------------------
.SaveAndCloseFile:
jmp.if.d '!=',[FILE.Handle],0, .SetPointer
api CreateFile, FILE.SelectedFile, GENERIC_WRITE+GENERIC_READ, 0, 0,OPEN_ALWAYS, FILE_ATTRIBUTE_NORMAL, 0
.SetPointer:
api SetFilePointer, [FILE.Handle],0,0,FILE_BEGIN
api SetEndOfFile,[FILE.Handle]
api WriteFile,[FILE.Handle],FILE.Bfr,[FILE.Size],FILE.BytesWritten,0
api CloseHandle,[FILE.Handle]
mov [FILE.Handle], dword 0
jmp DEF_EXIT_CALLBACK
This code assumes that the condition of [FLAG.FileChanged?] is always kept up to date by the code, so that a condition 'Yes' means that the contents of the file, copied into the buffer, have been changed.
Otherwise, the contents of the file have not been changed, and there is thus no need to display the message box, so the code jumps to the '.CloseFile' code, to test whether or not the file is still open, before sending the WM_CLOSE message to the callback default procedure. It is assumed that the policy exists that, if a file has been closed, the variable which saves the handle is always set to 0, so that this will always indicate that no file is open.
If the file has been changed, the message box is displayed. First of all, the three callback parameters [MESSAGE], [WPARAM], and [LPARAM], are saved, so that they will not be altered by the message box API function.
This alteration will occur, because of the fact that the internal code of the message box causes a series of messages to be sent to the program, before it returns
with the user selection, and this will obliterate the original WM_CLOSE message and its parameters. In order to avoid this, the message and its parameters must be saved, and later restored.
The message box is next displayed, with flags that specify 'Yes', 'No', and 'Cancel' options, and a question mark icon. This is a 'system modal' box, which means that all applications are suspended until the user has responded to the box. The text string for the message box is defined at the variable address, MB.Text, and the title string at the variable address MB.Title, as shown below.
If the user selects the 'Yes' option, the file is truncated to zero bytes, and then the data in the buffer is written to it, and the file is closed.
If the user selects 'No', the file is simply closed, leaving the existing data in the file unchanged.
If the user selects 'Cancel', the file is left open, and the WM_CLOSE message is aborted, so that the program remains open and active.
[section .data]
MB.Text db 'File contents have changed',13,10,'Do you want to save changes?',0
MB.Title db 'Program',0
The '13,10', here, is a 'carriage return, new line' character pair, that puts the second text string on a new line in the message box, below that of the preceding text. The title I have indicated is 'Program', since the title of the message box is usually simply the name of the program that has displayed it.
When the message box returns, the user's choice (one of the equate values, IDYES, IDNO, or IDCANCEL) is saved in the variable, [FLAG.MsgBox], and the three callback parameters [MESSAGE], [WPARAM], and [LPARAM] are popped back off the stack where they were previously saved.
STANDARD FILE OPEN AND FILE SAVE DIALOG BOXES:
I can assume that you will be familiar with the dialog box that is displayed if you click on a window 'file' menu, and then click the popup item 'Open'. The dialog box displayed will contain a window with a list of files from which a user can select a file to open. This is called a 'File Open' dialog box.
You will get a similar dialog box if you select the popup item 'Save As', except that this allows a user to create a file name, in order to save file data to a new file, or select an existing file to overwrite with new data. This is referred to as a 'File Save' dialog box.
Both of the above are standard, system dialog boxes, which the code displays by calling the relevant API function, as described below.
It is possible to create custom dialog boxes by creating templates and instructing the system to use them. However, since most applications use the normal system dialog boxes, we will confine our attention to these.
The File Save dialog box can be displayed in response to a WM_CLOSE message, instead of the message box method described above, and will sometimes be the case if a program allows a user to create new data in a buffer, without opening an existing file, and thus without having specified any file name. The message box method, however, can still be used, instead, if the program always creates a default file name, in which case the user will have to rename the file later, if desired, via its icon.
The API function call to display the file open and file save dialog boxes are as follows:
call FILE.InitOpenFileNameStructure
api GetOpenFileName,OPENFILENAME
and to display the file save dialog box is
call FILE.InitOpenFileNameStructure
api GetSaveFileName,OPENFILENAME
Both of these use the same, single parameter, OPENFILENAME, which is a rather lengthy data structure, the elements of which must be filled in properly if the dialog box is to be successfully displayed. 'call FILE.InitOpenFileNameStructure' refers to the program code that fills in the values of the elements of the OPENFILENAME structure, as shown further on.
The discussion that follows describes a bug associated with the use of the data structure and dialog boxes, which is not an actual system code fault but, rather, what I would call an administrative defect. But it can cause your debug file, for example, to be transferred to another directory, possibly making you think the debug code has ceased to function.
These dialog boxes also have the effect of interfering with the current message parameters, as was mentioned above, in the context of message boxes. First I will display the OPENFILENAME data structure, and then the basic values that are to be entered into it.
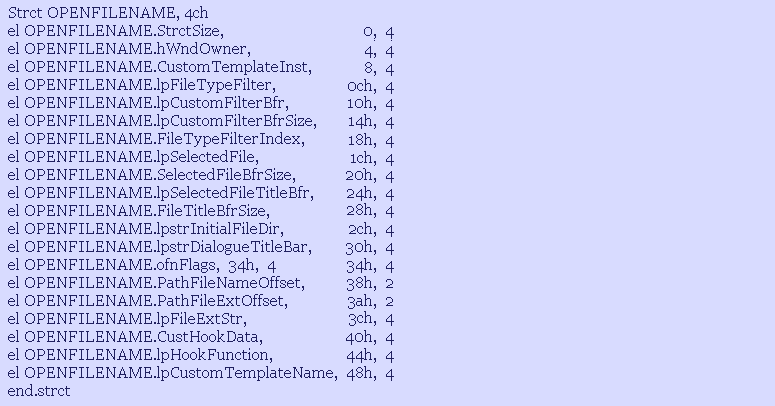
FILE
.InitOpenFilenameStructure:
;
eq [OPENFILENAME.StrctSize], '=', 4ch
eq [OPENFILENAME.hwndOwner], '=', 0
eq [OPENFILENAME.CustomTemplateInst], '=', 0
eq [OPENFILENAME.lpFileTypeFilter], '=', 0
eq [OPENFILENAME.lpCustomFilterBfr], '=', 0
eq [OPENFILENAME.CustomFilterBfrSize], '=', 0
eq [OPENFILENAME.FileTypeFilterIndex], '=', 0
eq [OPENFILENAME.lpSelectedFile], '=', FILE.SelectedFile
eq [OPENFILENAME.SelectedFileBfrSize], '=', 100h
eq [OPENFILENAME.lpSelectedFileTitleBfr], '=', 0
eq [OPENFILENAME.FileTitleBfrSize], '=', 0
eq [OPENFILENAME.lpstrInitialFileDir], '=', 0
eq [OPENFILENAME.lpstrDialogueTitleBar], '=', 0
eq [OPENFILENAME.ofnFLAGS], '=', 0
eq.w [OPENFILENAME.PathFileNameOffset], '=', 0
eq.w [OPENFILENAME.PathFileExtOffset], '=', 0
eq [OPENFILENAME.lpFileExtStr], '=', 0
eq [OPENFILENAME.CustHookData], '=', 0
eq [OPENFILENAME.lpHookFunction], '=', 0
eq [OPENFILENAME.lpCustomTemplateName], '=', 0
ret
This is about the most basic form of the entries in the OPENFILENAME structure that will allow the display of the dialog box. It contains only the structure size, the selected file buffer address, to receive the name of the file selected by the user, and the buffer size (100h).
eq is a high level assembly language macro which provides for use of the '=' sign, which has to be in
inverted commas to prevent it being misinterpreted by the macro preprocessor. Each line sets the parameter on the left equal to the value on the right. eq, by default, sets dword values, so eq.w is used for setting word sized values.
The following is a more useful version of the OPENFILENAME structure element values.
.InitOpenFilenameStructure:
;
eq [OPENFILENAME.StrctSize], '=', 4ch
eq [OPENFILENAME.hwndOwner], '=', [WINDOW.Handle]
eq [OPENFILENAME.CustomTemplateInst], '=', 0
eq [OPENFILENAME.lpFileTypeFilter], '=', FILE.Type
eq [OPENFILENAME.lpCustomFilterBfr], '=', 0
eq [OPENFILENAME.CustomFilterBfrSize], '=', 0
eq [OPENFILENAME.FileTypeFilterIndex], '=', 1
eq [OPENFILENAME.lpSelectedFile], '=', FILE.SelectedFile
eq [OPENFILENAME.SelectedFileBfrSize], '=', 100h
eq [OPENFILENAME.lpSelectedFileTitleBfr], '=', FILE.SelectedFileTitle
eq [OPENFILENAME.FileTitleBfrSize], '=', 100h
eq [OPENFILENAME.lpstrInitialFileDir], '=', 0
eq [OPENFILENAME.lpstrDialogueTitleBar], '=', 0
eq [OPENFILENAME.ofnFLAGS], '=', OFN_EXPLORER+OFN_NOCHANGEDIR
eq.w [OPENFILENAME.PathFileNameOffset], '=', 0
eq.w [OPENFILENAME.PathFileExtOffset], '=', 0
eq [OPENFILENAME.lpFileExtStr], '=', 0
eq [OPENFILENAME.CustHookData], '=', 0
eq [OPENFILENAME.lpHookFunction], '=', 0
eq [OPENFILENAME.lpCustomTemplateName], '=', 0
ret
The first element is the total structure size, in bytes, 4ch. Then we have the window handle of the window that is displaying the dialog box, and then the custom template element is set to 0, since a custom template is not being used.
The next element is a file type filter, which means that it selects, or 'filters' the types of files the dialog box will display. The dialog box does not automatically display all files, but can display only those file types that can be of interest to the program.
This filter system, which consists of a list of file types, must be created correctly. For example, we will suppose that we want the dialog box to provide a choice for the user to display either text files, include files, or all files. The documentation states that the
list of file types must consist of pairs of filter strings, where each pair specifies a file type name, and then its extension. The pairs must be zero terminated, and the overall list must be terminated in a double zero.
In our current example, we will need to have the pairs "text files, *.txt", "include files, *.inc", and "all files, *.*". FILE.Type is the address of the buffer in which these strings are declared. However, you must write them in correctly to get the correct result. It may not be initially clear to a reader of the documentation, as I found in my own initial reading of it, that all the strings must be separated by zeros, and not only the pairs. If you separate only the pairs with zeros, as follows,
[section .data]
FileType db "Text Files,*.txt",0,"Include Files,*.inc",0,"All Files,*.*",0,0
you will get a dialog box, but it won't work properly as far as the listing and user selection of file types is concerned. The strings must be written into the buffer as shown below, with each string separated
from the others by a zero. The double zero at the end is, of course, to distinguish the end of the list from the zeros that only separate the strings within the list.
[section .data]
FileType db "Text Files",0,"*.txt",0,"Include Files",0,"*.inc",0,"All Files",0,"*.*",0,0
OPENFILENAME.FileTypeFilterIndex element is a 1 based index into the above list of filter string pairs. That is, 1 is the index of the first pair, 'Text Files', and '*.txt' in the above example.
The FILE.SelectedFile buffer is filled by the GetOpenFileName function with the full path and filename for the file selected by the user, and the address FILE.SelectedFile can be simply inserted into the CreateFile API function to open the file.
FILE.SelectedFileTitle will contain only the filename itself, without the full path information.
There is a variety of flags available to use in the OPENFILENAME.ofnFLAGS element. The flag, OFN_EXPLORER, ensures that the later style of dialog box is displayed, whatever version of the operating system is being used. It is possible to allow the user to select multiple files, with multiple file names being written into the FILE.SelectedFile buffer but, ONF_ALLOWMULTISELECT, which is the flag for this, not shown above, must be included. There are also flags that specify whether or not the file must exist, whether or not to prompt the user via a message box, whether or not to intercept internal dialog box messages via a hook function, and others
The other flag, OFN_NOCHANGEDIR, used above, is a very important flag in that the dialog box can cause an apparent bug to manifest within your program. The problem is as follows:
You can use the dialog box to browse for and select a file in any directory. If you select a file in a directory different from the current directory, and the flag OFN_NOCHANGEDIR is not specified, and your code later tries to open another file in the current directory, such as a debug file, or whatever, without using the dialog box, the code will fail to open the file in the current directory, and will open or create it in whatever directory might have been selected by the dialog box. This is because the dialog box automatically changes the current directory to the one selected, not only for its own further use, but also for your program calling process itself.
This is a defect inherent in the dialog box code itself, so that you need to reset your program's current directory after calling the GetOpenFileName function. Alternatively, the OFN_NOCHANGEDIR flag prevents the dialog box changing the current directory, whatever might be the directory from which a file is selected in the dialog box.
This, again, is another of those potentially frustrating and time wasting problems for which a solution can be very hard to find. I finally discovered the answer to this problem only after searching the internet for a forum in which someone else had posted a
description of the same problem, and received the answer.
The OPENFILENAME.lpCustomFilterBfr element appears to work as an alternative to the OPENFILENAME.lpFileTypeFilter when you want to use only one pair of filter strings, in which case you can put the FILE.Type buffer address in this element, instead of in the FileTypeFilter element, as in the example above, setting the latter to zero.
However, I can't say I am really clear about the relative workings of these two elements of the data structure. If you do use the CustomFilterBfr element, though, you must have the following values:
mov ecx,FILE.Type
eq [OPENFILENAME.lpCustomFilterBfr], '=', ecx
eq [OPENFILENAME.CustomFilterBfrSize], '=', 28h
That is, the buffer size must be no less than 28h in size, and the BfrSize element must be set to a value of no less that 28h. If it is set to less than this value, the dialog box will fail to be displayed.
The other elements, set to zero, are not necessary for the straightforward working of the dialog box, as described here, but I will briefly mention the elements that refer to the hook function.
A system dialog box is a program in itself, with its own internal code, and message loop. A so called hook function is a consequence of the operating system giving access to the internal messaging system of such a system program, providing the facility for the external code to intercept and monitor, or even alter the messages.
It may be possible to discard and abort a particular message, or sometimes modify its effect. The part of your program code that you write in order to operate on such messages is called a 'hook function'.
OPENFILENAME.lpHookFunction will contain the address of the hook function, and OPENFILENAME.CustHookData is a value that will be passed, as a parameter, to the LPARAM component of the WM_INITDIALOG message intercepted by the hook function.
I don't intend to pursue this further, since the purpose here is to introduce the reader to the straightforward, or default, use of the dialog box. You may write many programs and never need to use a hook function, but it is a good idea to be aware of it as a possibility.
The following section displays the code for opening and reading a file in the context of the normal or default use of the file open dialog box.
USING THE DIALOG BOX TO OPEN A FILE:
call FILE.InitOpenFilenameStructure
push.d [MESSAGE],[WPARAM],[LPARAM]
api GetOpenFileName,OPENFILENAME
cmp eax,TRUE
jne near .exit_of
api CreateFile, FILE.SelectedFile, GENERIC_WRITE+GENERIC_READ, 0, 0, OPEN_ALWAYS, FILE_ATTRIBUTE_NORMAL, 0
mov [FILE.Handle],eax
api GetFileSize,[FILE.Handle],0
mov [FILE.Size],eax
jmp.if.d '=',[FILE.Size],0, .exit_df
api SetFilePointer,[FILE.Handle],0,0,FILE_BEGIN
api ReadFile,[FILE.Handle],FILE.Bfr,[FILE.Size],FILE.BytesRead,0
api CloseHandle,[FILE.Handle]
mov [FILE.Handle],dword 0
pop.d [LPARAM],[WPARAM],[MESSAGE]
ret
.exit_of:
pop.d [LPARAM],[WPARAM],[MESSAGE]
ret
The above code describes the opening of a file, selected by means of the file open dialog box, and reading the selected file data into a buffer or array provided by the program data section.
As in the case with calling a system message box, it is necessary to save the current message parameters on the stack when calling the dialog box function, and pop them back off the stack later. The dialog box alters these parameters by causing new messages to be sent to the program message loop.
Apart from this, the code initialises the OPENFILENAME structure, calls the GetOpenFileName function, opens the file selected by the user, or skips to the exit if no file is selected, and then sets the file pointer, reads the file into a buffer, and then closes it again. As mentioned already, it is a good idea to have a policy of always setting the variable [FILE.Handle] to 0 after closing a file, so that it can be automatically used as a flag to show that no file is currently open.
The GetOpenFileName function will place the name of the selected file, as a string, in the array variable,
FILE.SelectedFile, via the data structure (OPENFILENAME)
The GetFileSize API function gets the current size of the file, and saves it in [FILE.Size], for use by the ReadFile API function. If the file size is currently zero, the code skips to the exit, but leaves the file open. Otherwise it sets the file pointer to the beginning of the file and reads the data from the file into an array address, FILE.Bfr, by means of the ReadFile API function.
ReadFile puts a record of the value of the number of bytes it has actually read into the variable FILE.BytesRead.
This code contains a few of the High Level Assembly macros that I use. push.d (.d means dword) means push all the parameters, which are separated by commas, onto the stack in the order they are written. The corresponding pop macro is pop.d. The macro jmp.if.d means jump to .exit_df if (the dword sized) [FILE.Size] equals 0. Otherwise skip to the next instruction.
USING THE DIALOG BOX TO UPDATE AND CLOSE A FILE:
The following code gives an example of the use of the file save dialog box, in the context of saving data to a file selected by the user.
It is assumed, in this code, that no file is already open, and that the data was simply created by the program in a buffer.
If a file is already open, the filename will have to appear in the file name field of the dialog box, and this requires entering the file name into the
FILE.SelectedFile buffer before calling the GetSaveFileName function, so that it can pick up the file name via the OPENFILENAME data structure, which will have the address of the FILE.SelectedFile buffer.
The overall code used with the file save box is virtually the same as that for the file open dialog box, except that data is written to the file, rather than read from it, as follows:
push.d [WINDOW.Handle], [MESSAGE],[WPARAM],[LPARAM]
call .InitOpenFilenameStructure
api GetSaveFileName,OPENFILENAME
cmp eax,TRUE
jne near .exit_cf
api CreateFile, FILE.SelectedFile, GENERIC_WRITE+GENERIC_READ, 0, 0, OPEN_ALWAYS, FILE_ATTRIBUTE_NORMAL, 0
mov [FILE.Handle],eax
api SetFilePointer, [FILE.Handle],0,0,FILE_BEGIN
api SetEndOfFile,[FILE.Handle] ;truncate file
api WriteFile,[FILE.Handle],FILE.Bfr,[FILE.Size],FILE.BytesWritten,0
api CloseHandle,[FILE.Handle]
.exit_cf:
pop.d [LPARAM],[WPARAM],[MESSAGE],[WINDOW.Handle]
ret
Part I: Part I Introduction
Chapter 1: Binary numbers, code, and procedures
Chapter 3: Assembly Language
Chapter 4: Assembly Language Code example
Chapter 5: Macros and HLA
Chapter 6: HLA code example
Chapter 7: The Windows operating system
Chapter 8: Data Structures
Chapter 9: How to Create a Windows Program
Chapter 10: How to Create an Exe File
Chapter 11: Structured Programming and OOP
Part II: Part II Introduction
Chapter 12: Debugging a Windows Program Code
Chapter 13: Painting the Window Client Area
Chapter 14: Creating Window Menus
Chapter 15: How to Create Toolbars
Chapter 16: How to Create Popup Menus
Chapter 17: About the Windows Clipboard
Chapter 18: How to Create Bitmaps
Chapter 19: Icons and the Ico Format
Chapter 20: Common Dialog Boxes
Chapter 21: Working with Files
Chapter 22: Scrollbars and Scrolling
Chapter 23: How to Send Data to the Printer
Chapter 24: Miscellaneous Topics
© Alen, June 2014
alen@alenspage.net
Material on this page may be reproduced
for personal use only.