CHAPTER 4
ASSEMBLY LANGUAGE CODE EXAMPLE.
The following code example is designed to give readers not previously acquainted with Assembly Language a feel for how it works.
This is actual, useful code that can be saved and used in any program as desired.
WHAT THE CODE DOES.
What the code does is to convert a raw number into printable digits, or convert a set of printable digits into a raw number. For this purpose, there are three versions of any number that have to be considered. First is the raw number in binary form. Second is the number in numerical digits, in decimal form. And third is the number in printable digits. The difference between numerical digits and printable digits is that a numerical digit is a number, whereas a printable digit is a character code. The character code for the digit 0, for example is 30h, which is the code that can tell the operating system to print the character '0' onto the screen. That is, the character code selects the printable character bitmap from a font, and is not equal to the numerical value used in calculations.
The ASCII character codes for the numbers 0 to 9 are, 30h, 31h, 32h, 33h, 34h, 35h, 36h, 37h, 38h, 39h. They can be used in this form in a program, but they can also be written as digits in parentheses as: '0','1','2','3','4','5','6','7','8','9'. When the assembler comes across '1', for example, it replaces it with the character code 31h, whereas 1 is regarded as a numerical value.
In the code example, the following array, which has to be declared in the data section of the code, is used in the subsequent code as a source for converting numerical digits into character codes:
NUMBER.Chars.Src db '0','1','2','3','4','5','6','7','8','9'
Here the position of the character code, as an offset, relates to the corresponding numerical digit, as follows: If you write, as a code instruction,
mov al,[NUMBER.Chars.Src+2]
the character code at offset 2 is the character code for the number 2, and will be moved into al. This array thus provides an easy way to convert a numerical value into the character code for that
value. Therefore, if you have a decimal number 3041, for example, you can retrieve the character string equivalent '3','0','4','1', by reading the 3, 0, 4, and 1 offsets into the NUMBER.Chars.Src array. Note that '0' is at offset 0 in the array. The first offset of an array is always 0, and not 1.
To get the printable character codes from an input raw number in binary form, the number is first converted into individual, decimal, numerical digits, and these digits are then converted into character codes, in the above manner, which would allow the number to be printed in characters on the screen. The raw number input would probably be the result of calculations carried out by the program code, which the program would need to print as characters on the screen.
To convert a binary number into a set of decimal digits, a digit count process is set up in parallel with a corresponding binary, raw number count. When the raw number count equals the input raw number, the digit count is automatically equal to the input raw number, and the digits can then be converted into character codes.
To convert in reverse, from a set of input digit character codes, which might be typed by a user into a dialog box on the screen, the character codes are first converted into numerical digits, and then a digit count process is set up in parallel with a corresponding raw number count, as before. When the digit count numerical digits are all equal to the input numerical digits, the raw number count gives the equivalent raw number in binary form, which can then be used for calculations as desired.
Since both conversions use the same count process, they can largely use the same code, with only slight differences. Thus, the two procedures are created simply by means of different entry points to the same code, as we shall see.
HOW THE CODE WORKS:
THE PREPARATORY INPUT PART OF THE CODE:
In the following code, the maximum number of digits the code can handle is 4. However, the code can be easily extended to work with any number of digits, as desired. The code has two 'entry' points, which can be used as targets for two possible 'call' instructions: call NUMBER_.GetCharsFromNumber, or call NUMBER_.GetNumberFromChars. The first entry point label would be called if you wanted to convert printed number characters to the corresponding numbers, and the other if you wanted to do the reverse.
NUMBER_
.GetCharsFromNumber:
cmp dword [NUMBER.Input],0
je .exit
mov [FLAG],dword 1
jmp .start
.GetNumberFromChars:
mov [FLAG],dword 0
mov eax,0
mov ebx,0
mov ecx,0
mov esi,0
.nxt_char_in:
mov al,[NUMBER.Chars.in+esi]
.nxt_src_char:
mov bl,[NUMBER.Chars.Src+ecx]
cmp bl,al
je .set_number_in
inc ecx
jmp .nxt_src_char
.set_number_in:
mov [NUMBER.Numerical.Digits.in+esi],cl
cmp esi,4
je .start
inc esi
jmp .nxt_char_in
The above code is the preparatory input code. At the first entry point, which is labeled as .GetCharsFromNumber, we first test to make sure [NUMBER.Input] is not zero, and skip all the code to the exit if it is. The [FLAG] value, at the memory location FLAG, is set to 1, for later use. jmp .start then jumps to the '.start' entry point, or address, which is the start of the main conversion calculation.
The second entry point, which is labeled as .GetNumberFromChars, requires a little more initialisation. First of all, the [FLAG] variable (a stored memory value is often referred to as a 'variable') and a series of registers are all set to zero, as indicated. In this alternative, the input is in the form of byte-sized printable character codes, which have been put in the array variable NUMBER.Chars.in. mov al,[NUMBER.Chars.in+esi] gets the input character codes from NUMBER.Chars.in, one by one, by increasing the value of esi by one each time.
For example, suppose the input number is 3216. This will have been put in the array (by some other code, not described here) NUMBER.Chars.in as follows:
NUMBER.Chars.in db '3','2','1','6'
As NUMBER.Chars.src has the fixed form
NUMBER.Chars.Src db '0','1','2','3','4','5','6','7','8','9'
mov bl,[NUMBER.Chars.src+ecx] gets the character codes from NUMBER.Chars.src, the printable character code array, one by one, by similarly changing the value of ecx from 0 through to 9.
For each al value, cmp bl,al compares the values each time ecx is increased. When bl and al are equal, the character code in the NUMBER.Chars.src array is the same as the input character code, which means that the offset value, ecx, is now the decimal system numerical equivalent of the character code. For example, if esi starts with the value 0, then we have
al = [NUMBER.Chars.in+0] = '3'
We then set up
bl = [NUMBER.Chars.src+ecx]
and keep changing the value of ecx, and comparing bl and al each time. When ecx = 3, we have
bl = [NUMBER.Chars.src+3] = '3'
Since we now have bl = al = '3', and also ecx = 3, we have converted the character code '3' to the number 3 in ecx. We can now put the value of ecx, or the cl part of ecx, which contains the 3, into [NUMBER.Numerical.Digits.in+esi], where esi has the starting value 0. This is done by jumping to the label .set_number_in. So we have
[NUMBER.Numerical.Digits.in+0] = bl = 3
We now increase the value of esi from 0 to 1, in preparation for getting the second digit of the number, and then jump back to the label .nxt_char_in, and go through the same process for the second digit. When esi = 4, we have done all the digits, and so the code jumps to the .start label, which is the entry to the code that processes the digits to a single binary number. Then we will have
NUMBER.Chars.in db '3','2','6','1' NUMBER.Numerical.Digits.in db 3,2,6,1
Thus, the input character codes, in NUMBER.Chars.in, one by one, have been converted to create an equivalent and corresponding array of decimal system numerical values, which is the purpose of this initial segment of code.
NUMBER.Numerical.Digits.in is the array in which these decimal numerical values are stored.
After this the code jumps to the .start label address, in the principal code segment, to start the main conversion calculation.
THE MAIN CODE SEGMENT:
The label '.start' marks the beginning the code segment that contains the main calculation process to convert character codes to a binary number, or to convert a binary number to character codes. In either case, the character codes are converted initially to decimal digits, as we have seen above.
While it is possible to declare decimal numbers within Assembly Language Code, and these will be translated to binary equivalents by the assembler when the code is compiled, decimal numbers dynamically calculated or created, digit by digit, by the program, when it is running, must be explicitly converted to or from binary numbers. For example
NUMBER db 3261
is a decimal number declaration which can be defined, as is, in the data section of the code. But if these four digits are not declared but dynamically converted or created during the operation of the program, they will be misinterpreted as the wrong binary number, since there is no assembler to translate them to the correct binary equivalent. It is correct that each of these digits are actually binary numbers, since a program works only with binary numbers. If, however, one were to string the individual digit binary numbers together, one after the other, to get an overall binary number, this number would not have a value equivalent to that of the decimal number as a whole. The binary equivalent of the decimal number13, for example, is
1101, but the binary number for the digits 1 and 3, in bytes, are 0001 and 0011, respectively. Stringing these together would give a binary number 00010011, which is obviously incorrect.
To make the conversion, therefore, we must create a parallel decimal and binary count, which means that when we increase the decimal number by 1, we also increase the binary number by 1. When the decimal count equals the decimal number to be converted, the corresponding binary count automatically represents the binary equivalent of this decimal number
The main code segment is a combination of the two codes which 1) convert from a binary number to a decimal digit number, or 2) convert from a decimal digit number to a binary number. For greater clarity I initially separate these codes into separate code segments, so that they can be described independently of one another, and then show how they are combined into a single code segment, since they major parts of their codes are identical. The first code, immediately below, is that which converts from a binary number input, in the NUMBER.Input variable, or memory location, to a decimal number, which is counted in the decimal number array variable NUMBER.Numerical.Digits.out, and then converted to printable character codes in the NUMBER.Chars.out variable.
CONVERTING A BINARY NUMBER TO A DECIMAL DIGIT NUMBER:
.start:
mov eax,0
lea esi,[NUMBER.Numerical.Digits.out+3]
mov byte [esi], 0
mov byte [esi-1],0
mov byte [esi-2],0
mov byte [esi-3],0
.nxt_count:
inc eax
inc byte [esi]
cmp byte [esi],10
je .digit2
.number?:
cmp eax,[NUMBER.Input]
je .get_output_chars
jmp .nxt_count
.get_output_chars:
mov edi,0
mov eax,0
.set_char_out:
mov al,[NUMBER.Numerical.Digits.out+edi]
mov bl,[NUMBER.Chars.Src+eax]
mov [NUMBER.Chars.out+edi],bl
inc edi
cmp edi,3
ja .exit
jmp .set_char_out
.exit:
ret
.digit2:
mov [esi],byte 0
inc byte [esi-1]
cmp byte [esi-1],10
je .digit3
jmp .number?
.digit3:
mov [esi-1],byte 0
inc byte [esi-2]
cmp byte [esi-2],10
je .digit4
jmp .number?
.digit4:
mov [esi-2],byte 0
inc byte [esi-3]
cmp byte [esi-3],10
je .overflow_error
jmp .number?
'.start' begins a counting process, being a binary count in eax and a decimal digit count in NUMBER.Numerical.Digits.out, both starting at the numerical value 0. The binary count in eax is simple, and involves only the instruction inc eax, each time. A decimal digit count, however, is more complicated.
We must set up separate decimal digit values, individually, and then set the current digit to 0, and carry 1 to the next digit, whenever the count for a digit goes above the value 9.
NUMBER.Numerical.Digits.out is the array that contains these decimal digits, as follows: [NUMBER.Numerical.Digits.out+3] is digit 1, or the lowest value digit of the 4-digit number. The address of this is put in esi, for convenience, using the lea instruction. If, for example, we had counted the number 5346, 6 will be digit 1, at address esi, 4 will be digit 2, at address esi-1, 3 will be digit 3, at address esi-2, and 5 will be digit 4, at address esi-3. Digit 1 is counted first, as inc byte [esi]. Then cmp byte [esi],10 tests to see if it has counted to more than 9. If it has, je .digit2 jumps to the code at address .digit2, which sets digit [esi] to 0, and adds or carries 1 to digit 2 at [esi-1]. If this addition, in turn, counts [esi-1] to more than 9, then we have je .digit3, which jumps to code .digit3, which sets [esi-1] to 0 and carries 1 to [esi-2]. In this way the basic count, inc byte [esi], can cause a 1 to be carried right through to digit 4, in the .digit4 code, which thus creates a 4 digit decimal count.
The count, of course, must be equal to the input number in order that the output may be the desired conversion of the input number. As we have seen, the output has two forms: a binary output, and a decimal digit output.
CONVERTING A DECIMAL NUMBER IN PRINTABLE DIGITS TO A BINARY NUMBER:
.start:
mov eax,0
lea esi,[NUMBER.Numerical.Digits.out+3]
mov byte [esi], 0
mov byte [esi-1],0
mov byte [esi-2],0
mov byte [esi-3],0
.nxt_count:
inc eax
inc byte [esi]
cmp byte [esi],10
je .digit2
.number?:
mov [NUMBER.Output],eax
mov edi,0
.nxt_digit:
mov al,[NUMBER.Numerical.Digits.out+edi]
mov bl,[NUMBER.Numerical.Digits.in+edi]
cmp bl,al
jne .nxt_count
cmp edi,3
je .exit
inc edi
jmp .nxt_digit
.digit2:
mov [esi],byte 0
inc byte [esi-1]
cmp byte [esi-1],10
je .digit3
jmp .number?
.digit3:
mov [esi-1],byte 0
inc byte [esi-2]
cmp byte [esi-2],10
je .digit4
jmp .number?
.digit4:
mov [esi-2],byte 0
inc byte [esi-3]
cmp byte [esi-3],10
je .overflow_error
jmp .number?
In the preparatory input part of the code, in the previous section, we have seen how an input in printable decimal character codes are converted to an input in actual decimal number digits. At the .start input address above, this has therefore already been done, and the decimal digit input is in the memory array NUMBER.Numerical.Digits.in
At the .start entry point, eax, which is used for the binary count, is set to 0, and all the digits in the NUMBER.Numerical.Digits.out variable, which is the decimal count, are also set to 0, as before. The lea (load effective address instruction) again transfers the NUMBER.Numerical.Digits.out digit addresses to register esi.
'.nxt_count' begins the counting process, being a binary count in eax and a decimal digit count in NUMBER.Numerical.Digits.out, both starting at the numerical value 0.
As before, the .number? segment of the code tests to see if the count has equalled the input number. This time, since we want a binary output, the binary output NUMBER.Output is set equal to the current binary count in eax. The code then tests the decimal count in NUMBER.Numerical.Digits.out, digit by digit, with the input decimal number in NUMBER.Numerical.Digits.in. If any count digit is not equal to any input digit, the jne (jump if not equal) .nxt_count instruction returns the instruction pointer to the .nxt_count code address, to continue the count. If all digits are equal to one another, edi=3 (meaning all 4 digits have been compared), and je .exit jumps to the end of the code, since the desired binary output number is now in the NUMBER.Output memory location.
COMBINING THE TWO CODES:
.start:
mov eax,0
lea esi,[NUMBER.Numerical.Digits.out+3]
mov byte [esi], 0
mov byte [esi-1],0
mov byte [esi-2],0
mov byte [esi-3],0
.nxt_count:
inc eax
inc byte [esi]
cmp byte [esi],10
je .digit2
.number?:
cmp dword [FLAG],0
je .compare_digit_numbers
cmp eax,[NUMBER.Input]
je .exit
jmp .nxt_count
.digit2:
mov [esi],byte 0
inc byte [esi-1]
cmp byte [esi-1],10
je .digit3
jmp .number?
.digit3:
mov [esi-1],byte 0
inc byte [esi-2]
cmp byte [esi-2],10
je .digit4
jmp .number?
.digit4:
mov [esi-2],byte 0
inc byte [esi-3]
cmp byte [esi-3],10
je .overflow_error
jmp .number?
.compare_digit_numbers:
mov [NUMBER.Output],eax
mov edi,0
.nxt_digit:
mov al,[NUMBER.Numerical.Digits.out+edi]
mov bl,[NUMBER.Numerical.Digits.in+edi]
cmp bl,al
jne .nxt_count
cmp edi,3
je .exit
inc edi
jmp .nxt_digit
.get_output_chars:
mov edi,0
mov eax,0
.set_char_out:
mov al,[NUMBER.Numerical.Digits.out+edi]
mov bl,[NUMBER.Chars.Src+eax]
mov [NUMBER.Chars.out+edi],bl
inc edi
cmp edi,3
ja .exit
jmp .set_char_out
.exit:
ret
It is clear that both codes use identical code segments to carry out the binary and decimal counting process. Only the number comparison parts of the codes are different. It is possible, therefore, to avoid duplicating the counting part of the code and put the different number comparison segments into the same code, and use a Flag variable setting to determine which kind of number comparison is to be used.
Since the .number? segment of the code tests the count against the input number, it now first tests the value of the Flag. If the Flag value =0, the code jumps to .compare_digit_numbers to compare the decimal digit count with the input decimal digits. If the Flag value =1, the code passes the jump instruction and simply compares the binary count with the input binary number. This demonstrates how the two code segments for the two different kinds of inputs, and the two different kinds of conversion, can be combined into a single code segment, as indicated below
THE HEXADECIMAL NUMBER SYSTEM:
This was briefly mentioned before, but here I will go into it in more detail, making reference to the above code example.
Sometimes a programmer needs to write actual numbers into his code. He can often use decimal numbers, since the assembler is designed to translate them into binary numbers, but this can cause problems in some situations. Writing binary numbers directly is often problematic, since they are hard to read and write correctly, without inadvertent errors. It is possible, however, to use a non-decimal number system that harmonises better with the binary number system than does the decimal system.
The usual minimum chunk of data dealt with in a code is a byte, or 8 bits. 8 bits counts up to 255, so it would not be convenient to try to have a number system with 255 characters. Half a byte, however, counts up to the binary number 16, so it is more realistic to consider having a number system with 16 different characters. This is the hexadecimal number system. Consider, therefore, the following comparison of counting methods:
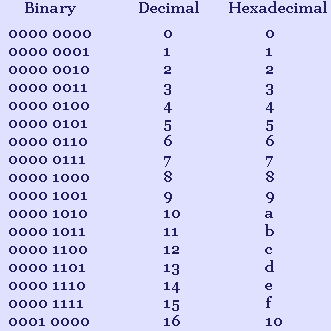
Notice here how there is no kind of synchronisation between the binary count and the decimal count when the decimal count changes from single digits to
double digits, after the count of 9. The binary count simply goes from 1001 to 1010. Consider, however, how there is a synchronisation between the binary count and the hexadecimal count when the hexadecimal count changes to double digits. At that point the lower four bits of the binary count become zero, and the higher four bits change from 0000 to 0001, which corresponds to the 1 in the 10 of the hexadecimal count. Thus, the hexadecimal count is the equivalent of treating a binary count of 4 bits as a single digit count, and a binary count of 8 bits as a double digit count.
Consider, now, the above Assembly Language code, and how it was necessary to use several special digit conversion code segments, digit2, digit3, and digit4, in order to deal with the change from single to double, or triple, digits when counting with decimal digits. In a hexadecimal count, the number can be counted without regard to the change to double digits, or triple digits, etc. since the necessary digits can be directly extracted from the final binary number, due to the synchronisation between each 4 bits of the binary number and each hexadecimal digit. The binary number 1111 1111, for example, is ff in hexadecimal, with two digits for two sets of four bits, but is 255 in the ordinary decimal version, i.e., with three digits. This is the reason why the hexadecimal number system can be so useful when indicating or specifying the values of binary numbers. The following is an example of a 32-bit binary number in hexadecimal form
Binary Hexadecimal 1001 1011 1111 0100 1001 0000 1110 0111 9bf490e7h
Each hexadecimal digit corresponds to the value of a 4-bit segment of the binary number, so there are 8 hexadecimal digits needed to express the value of a 32-bit binary number. The 'h' on the end is merely to indicate to the assembler that this is a hexadecimal number. Alternative ways of ndicating a hexadecimal number in NASM are by prefixing '0x' or '$', as follows:
0x9bf490e7 or $9bf490e7
THE COMPLETE CODE EXAMPLE:
The following is the code example dealt with in this chapter, printed as a single block of code, as it would appear in an Assembly Language code source file.
NUMBER_
.GetCharsFromNumber:
cmp dword [NUMBER.Input],0
je .exit
mov [FLAG],dword 1
jmp .start
.GetNumberFromChars:
mov [FLAG],dword 0
mov eax,0
mov ebx,0
mov ecx,0
mov esi,0
.nxt_char_in:
mov al,[NUMBER.Chars.in+esi]
.nxt_src_char:
mov bl,[NUMBER.Chars.Src+ecx]
cmp bl,al
je .set_number_in
inc ecx
jmp .nxt_src_char
.set_number_in:
mov [NUMBER.Numerical.Digits.in+esi],cl
cmp esi,4
je .start
inc esi
jmp .nxt_char_in
.start:
mov eax,0
lea esi,[NUMBER.Numerical.Digits.out+3]
mov byte [esi], 0
mov byte [esi-1],0
mov byte [esi-2],0
mov byte [esi-3],0
.nxt_count:
inc eax
inc byte [esi]
cmp byte [esi],10
je .digit2
.number?:
cmp dword [FLAG],0
je .compare_digit_numbers
cmp eax,[NUMBER.Input]
je .exit
jmp .nxt_count
.digit2:
mov [esi],byte 0
inc byte [esi-1]
cmp byte [esi-1],10
je .digit3
jmp .number?
.digit3:
mov [esi-1],byte 0
inc byte [esi-2]
cmp byte [esi-2],10
je .digit4
jmp .number?
.digit4:
mov [esi-2],byte 0
inc byte [esi-3]
cmp byte [esi-3],10
je .overflow_error
jmp .number?
.compare_digit_numbers:
mov [NUMBER.Output],eax
mov edi,0
.nxt_digit:
mov al,[NUMBER.Numerical.Digits.out+edi]
mov bl,[NUMBER.Numerical.Digits.in+edi]
cmp bl,al
jne .nxt_count
cmp edi,3
je .exit
inc edi
jmp .nxt_digit
.get_output_chars:
mov edi,0
mov eax,0
.set_char_out:
mov al,[NUMBER.Numerical.Digits.out+edi]
mov bl,[NUMBER.Chars.Src+eax]
mov [NUMBER.Chars.out+edi],bl
inc edi
cmp edi,3
ja .exit
jmp .set_char_out
.exit:
ret
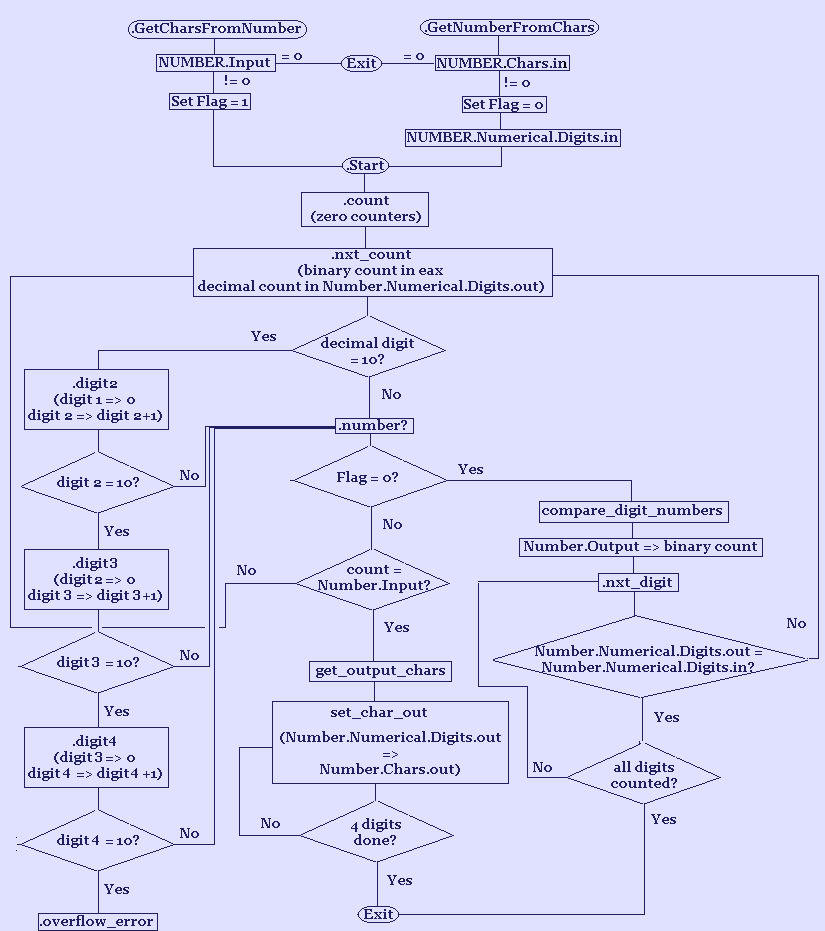
FLOW CHART:
The following is a flow chart of the complete code example. Flow charts can be a very useful tool to graphically describe the working of a code segment, or whole program. I think it is pretty well self-explanatory. For those not used to flow charts I will mention only that, as usual with flow charts, rounded elements represent entry or exit points, rectangular elements represent internal events, and diagonal shaped elements represent questions to be
answered or alternatives to be chosen.
For those not used to flow charts I will mention only that, as usual with flow charts, rounded elements represent entry or exit points, rectangular elements represent internal events, and diagonal shaped elements represent questions to be answered or alternatives to be chosen.
Part I: Part I Introduction
Chapter 1: Binary numbers, code, and procedures
Chapter 3: Assembly Language
Chapter 4: Assembly Language Code example
Chapter 5: Macros and HLA
Chapter 6: HLA code example
Chapter 7: The Windows operating system
Chapter 8: Data Structures
Chapter 9: How to Create a Windows Program
Chapter 10: How to Create an Exe File
Chapter 11: Structured Programming and OOP
Part II: Part II Introduction
Chapter 12: Debugging a Windows Program Code
Chapter 13: Painting the Window Client Area
Chapter 14: Creating Window Menus
Chapter 15: How to Create Toolbars
Chapter 16: How to Create Popup Menus
Chapter 17: About the Windows Clipboard
Chapter 18: How to Create Bitmaps
Chapter 19: Icons and the Ico Format
Chapter 20: Common Dialog Boxes
Chapter 21: Working with Files
Chapter 22: Scrollbars and Scrolling
Chapter 23: How to Send Data to the Printer
Chapter 24: Miscellaneous Topics
© Alen, August 2013
alen@alenspage.net
Material on this page may be reproduced
for personal use only.